Use this quick checklist to make sure your files are ready for a successful initial upload and to reduce the turn around time on your project.
See the detailed Art Guides below for program specific instructions.
File Format
Is your document a high Res PDF?
Document Size
Is your document sized correctly to include 1/4 bleed all around?
Cut Path
Do you have the correct spot color “Cut Path” applied to your cut path features?
Image Resolution
Will your images print at the quality you expect? Minimum 100 ppi for raster images, 300 ppi is recommended to make the most of your design.
Spelling and Grammar
Did you spell check and verify grammar? Nobody likes a grammer mistke, even when spelling made is correct it… 😀
Detailed Art Guides
Art Portal Tutorial
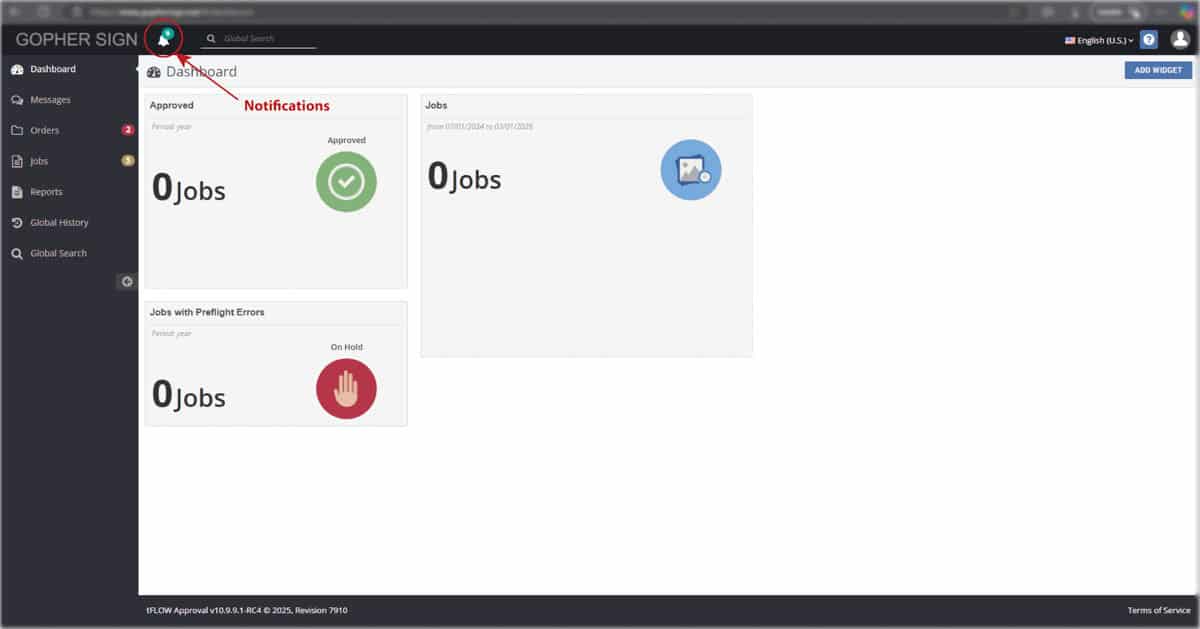
Welcome to Gopher Sign’s Art Portal platform. www.gophersign.net is our central location for file sharing, customer collaboration, art approval, and archiving for our ImageLOC and Enduraflect products. This tutorial will provide you with a strong foundation for the functions and capabilities of the workflow.
Once your order has been created by a Gopher Sign representative, we will create a company profile that can include multiple users who can upload or approve print jobs. Each user will receive a welcome message from us with login instructions. You will have access to all current and historical projects from this site.
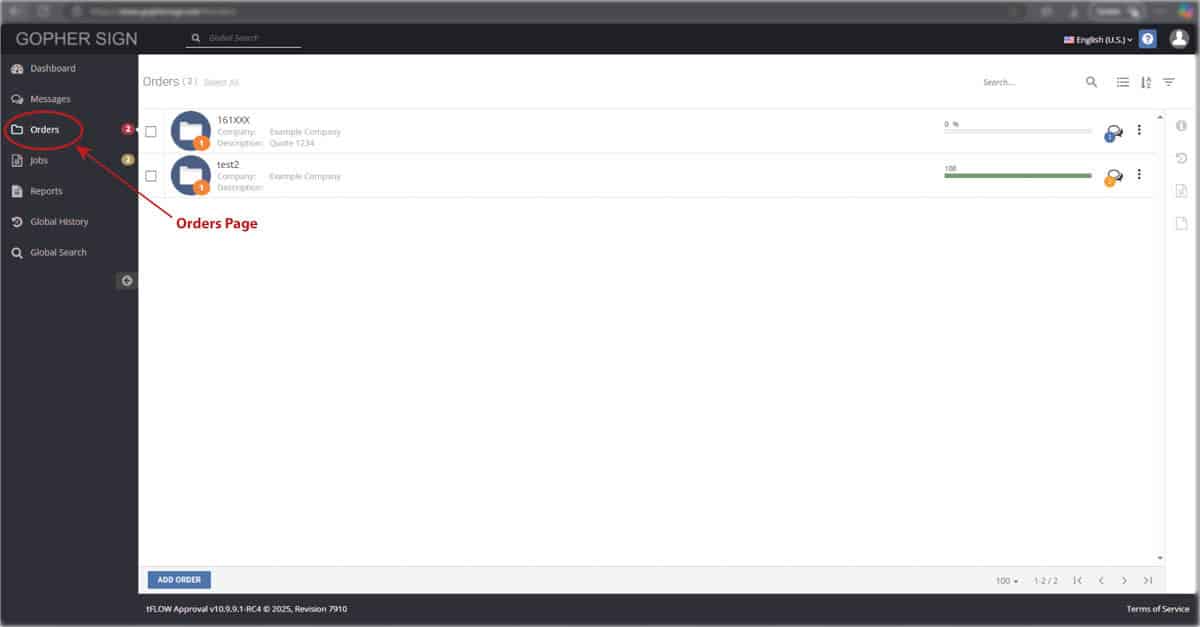
The Orders page shows all orders that your user is or has been assigned to. Double click on the order to view all the Jobs within the order. A newly created order will not have any jobs yet.
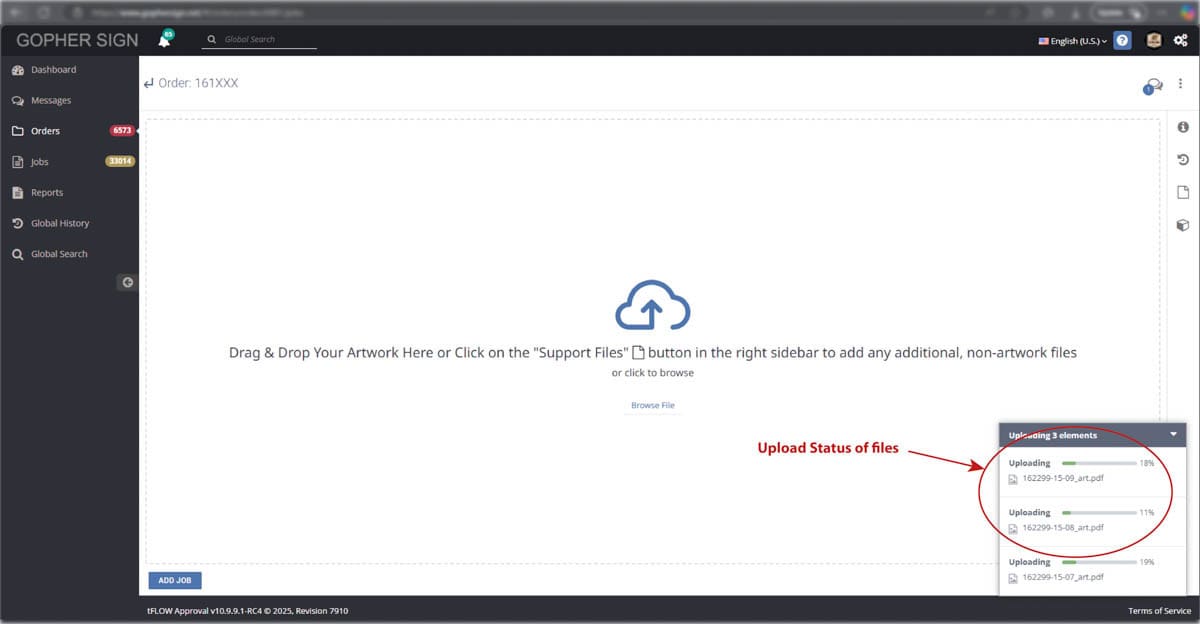
This is where you will drop your PDFs for uploading. You can drop one file at a time, a group of files all at once, or a multi-page PDF (file will be separated into separate jobs). An Adobe Illustrator file with PDF compatibility will also successfully process. Upload progress will be shown at the lower right.
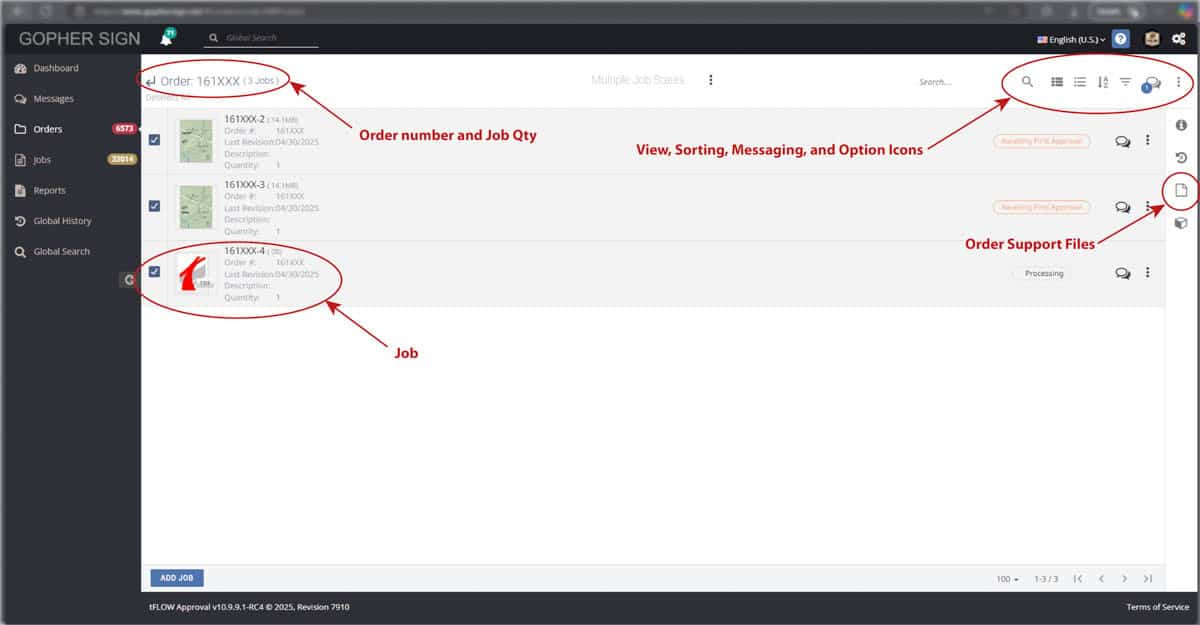
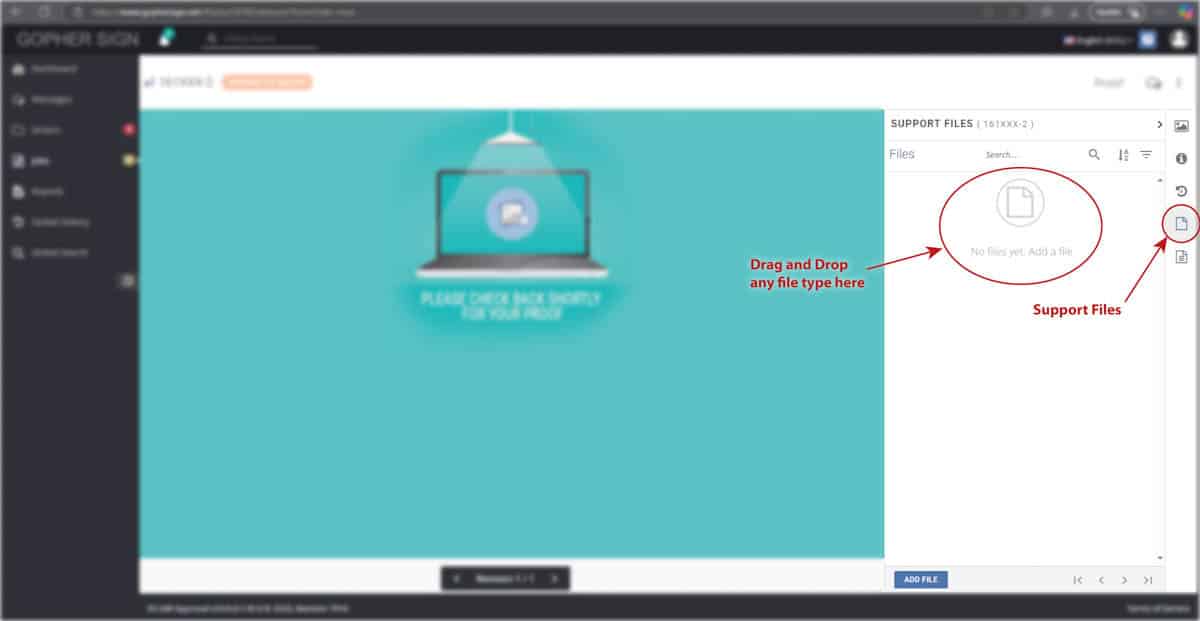
At the upper right of the screen, there are icons for different views and sorting methods for your jobs. The message system can be made at the Order level or at the individual Job level. The icon with three vertical dots is the options menu. The available options change depending on what is selected, and if you’re in the Order or the Job level. You can define order settings, view a history log, and supply support files. The support files icon is very useful for providing additional information such as mechanical or architectural drawings to supplement the print files. Any file format is accepted and will be retained with the order.
Upon uploading, your files will automatically begin preflight processing where file data is analyzed to allow presentation of your digital proof. The status “Awaiting First Approval” is Gopher Sign’s opportunity to review each file for compliance with our Art Guidelines. Visit that page here. Your submissions will typically be reviewed within 1-2 business days depending on the current workload.
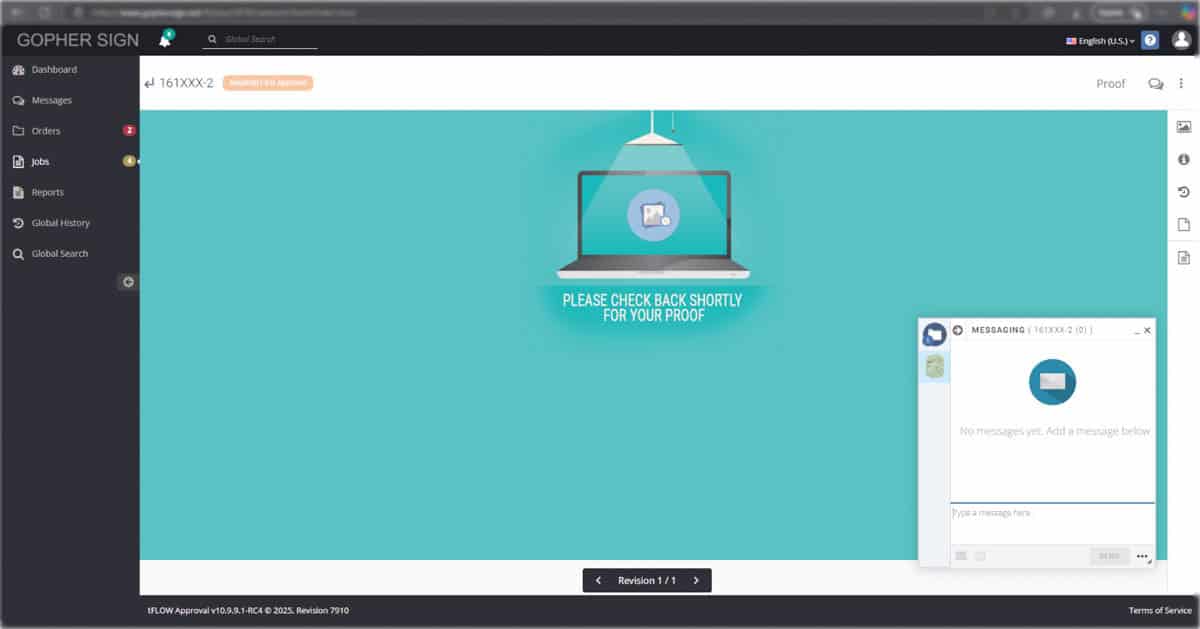
Here is an example of what the job looks like after submission and awaiting Gopher Sign’s first approval. Your proof will be available as soon as Gopher reviews the submission.
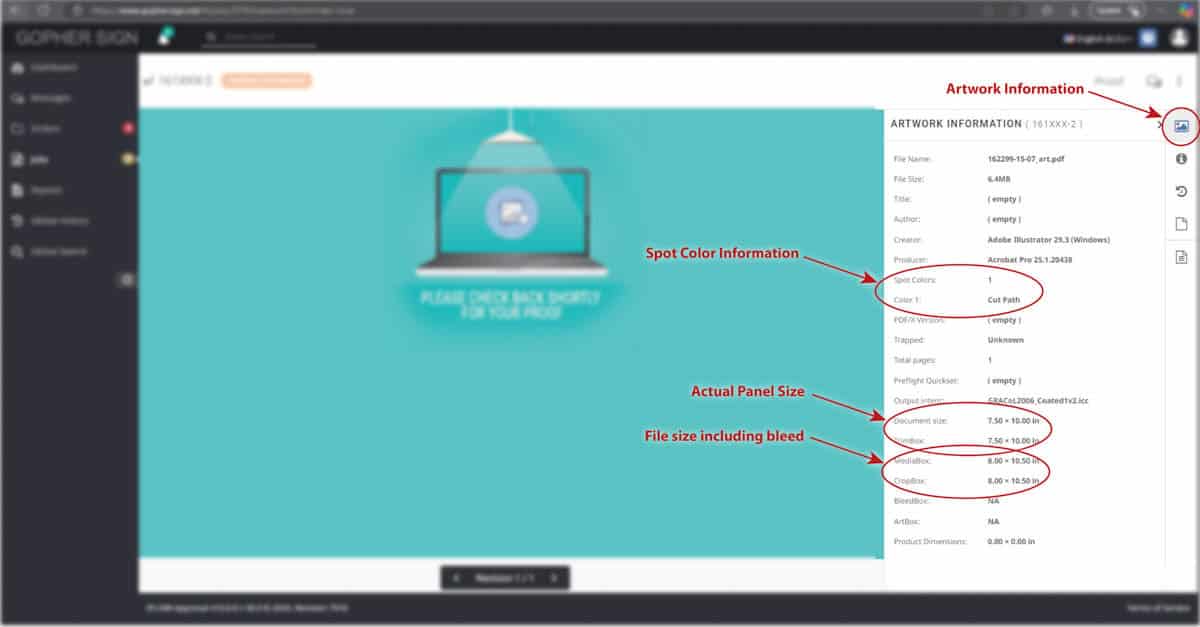
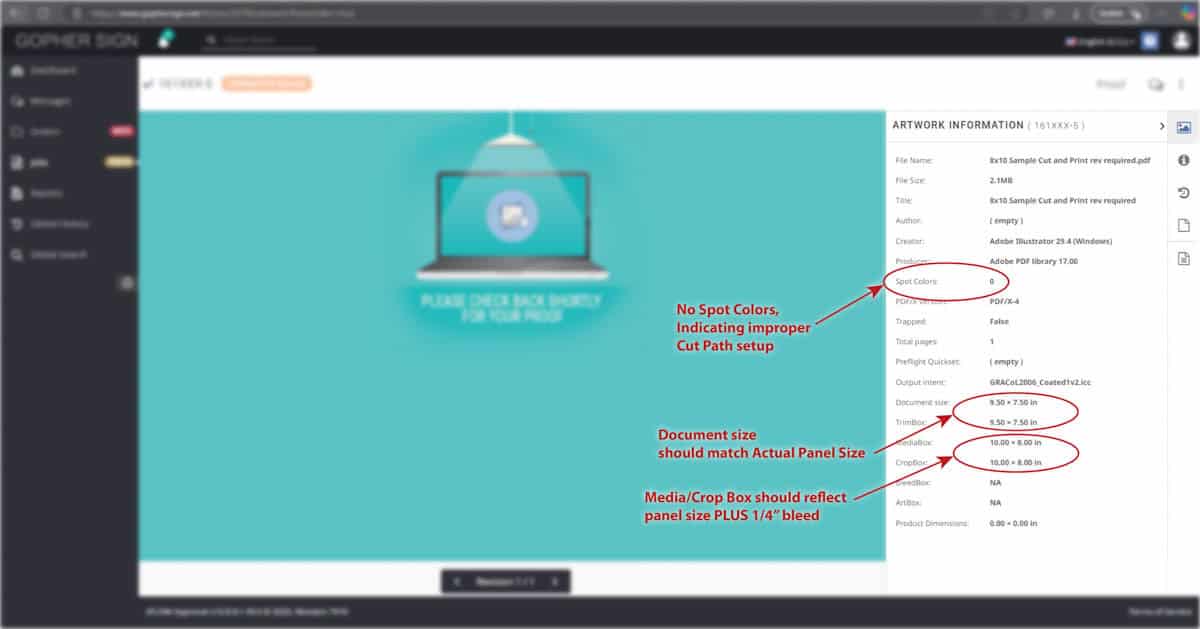
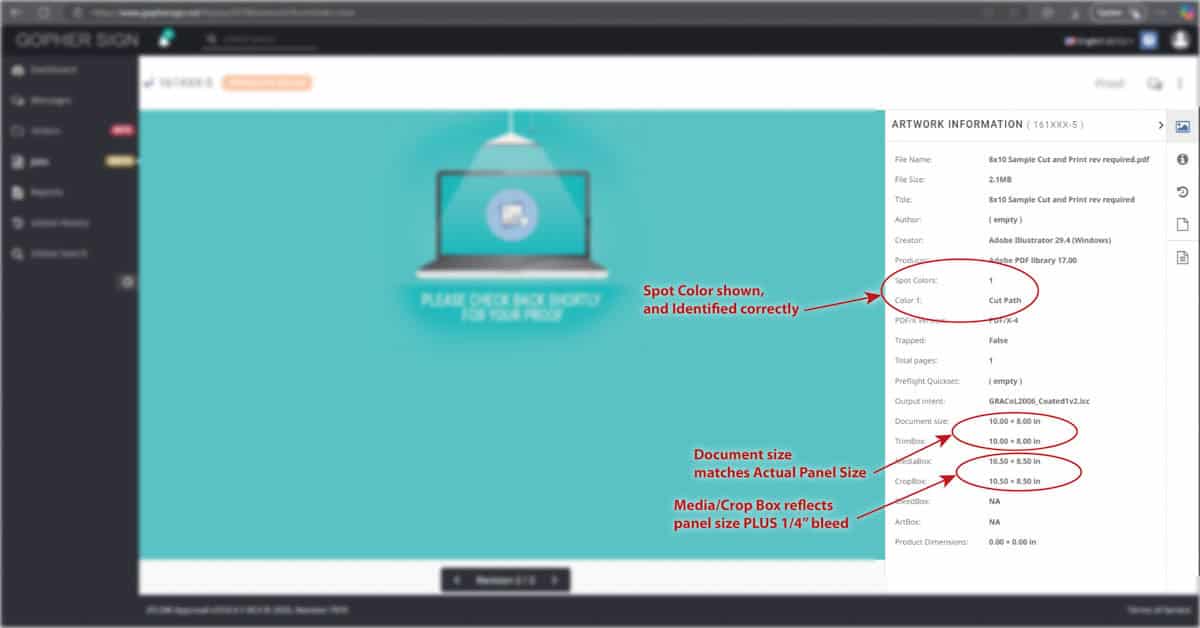
The Icons on the right provide additional details and settings for the Job. The Artwork Information icon gives you several critical pieces of information about your file. We are looking for the presence of a Spot Color named “Cut Path” which is used to indicate the panel shape and size as well as hole and stud location features. The document size/TrimBox is the size of the final panel PLUS bleed. The MediaBox/CropBox is the actual size of your panel, which is driven by simple math, subtracting 0.5” from the Document Size. ** Your file must be setup according to our prepress guidelines to ensure the panel size equals this calculated value. **
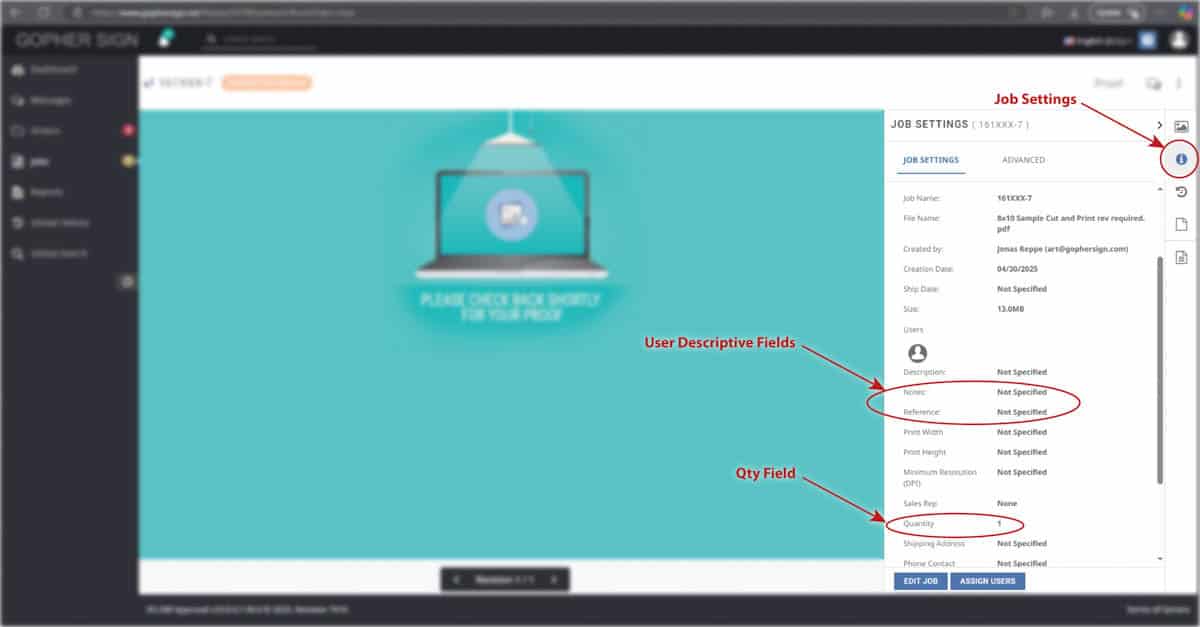
The Job Settings Icon allows you to define the quantity, Notes, and Reference details. The Job Name and Description fields will be overwritten by Gopher to aid our production team.
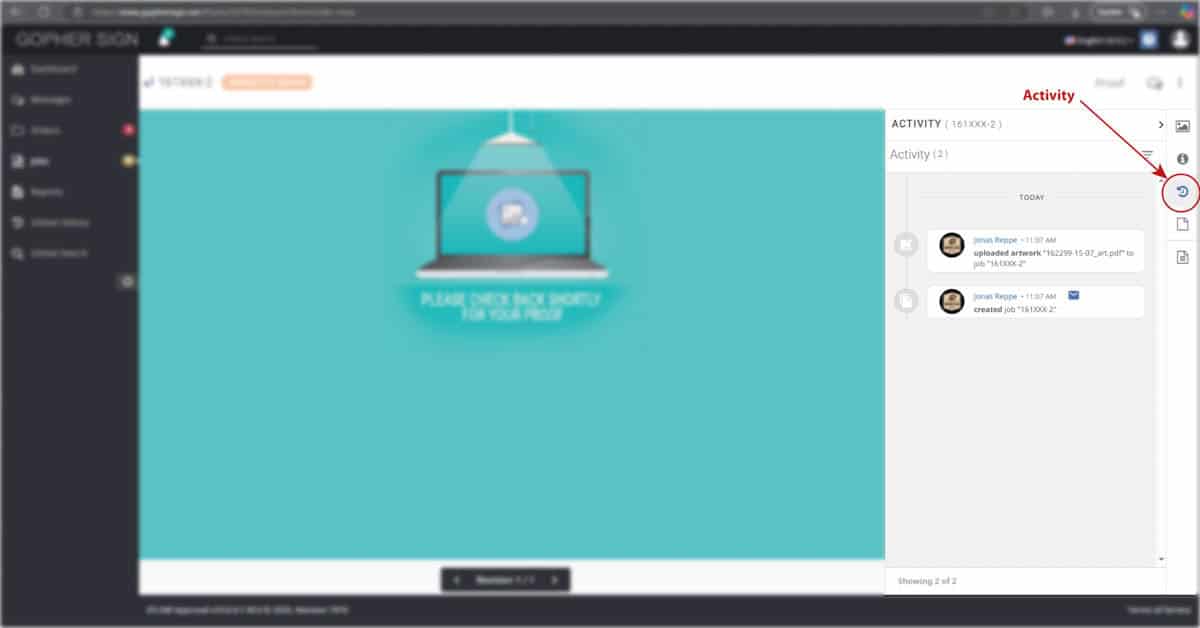
The Activity Icon shows a data log of the events associated with the job. You can view the activity at the order level as well. All uploads, revisions, approvals, and comments are time stamped and logged.
The Support document Icon has the same functionality at the Order level, and at the Job level. They are separate, support files submitted at the order level will not be visible at the job level. Support files submitted to an individual Job will be visible only from that Job.
The final icon is the Jobs function. It allows you to navigate to different jobs within the Job View. This is a handy short cut for navigating between different Jobs within an Order.
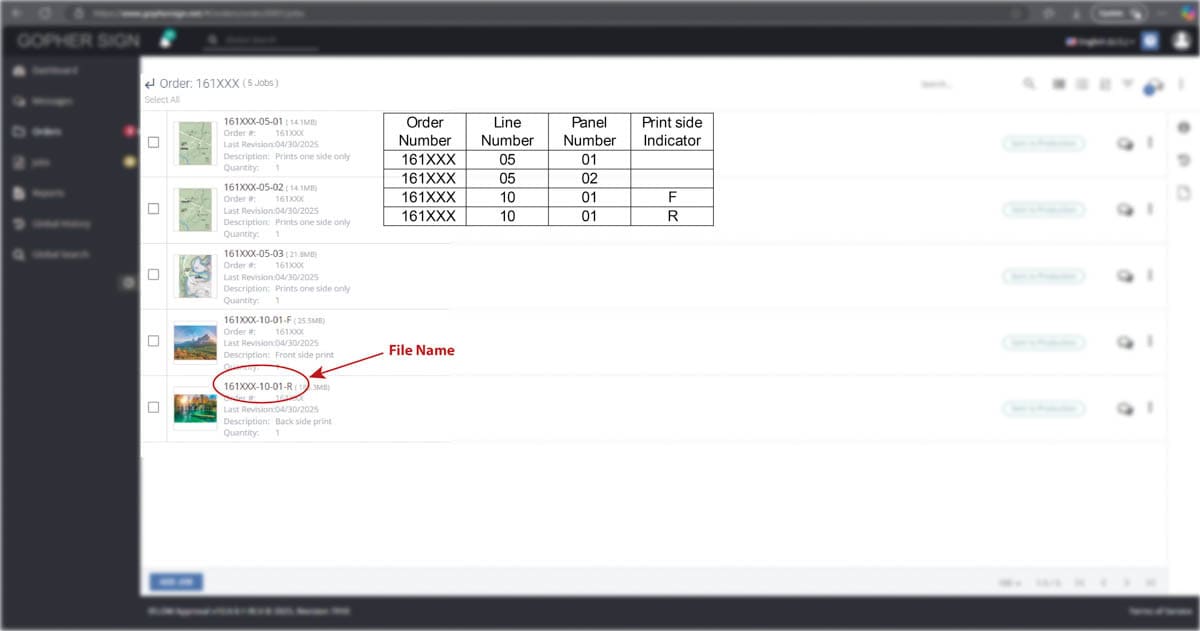
After Gopher has reviewed your file submissions, we will either Approve them or Request a Revision. Notation of print details will be placed in the description field of each job. The file name will also be renamed to align with your order. Naming convention is as follows:
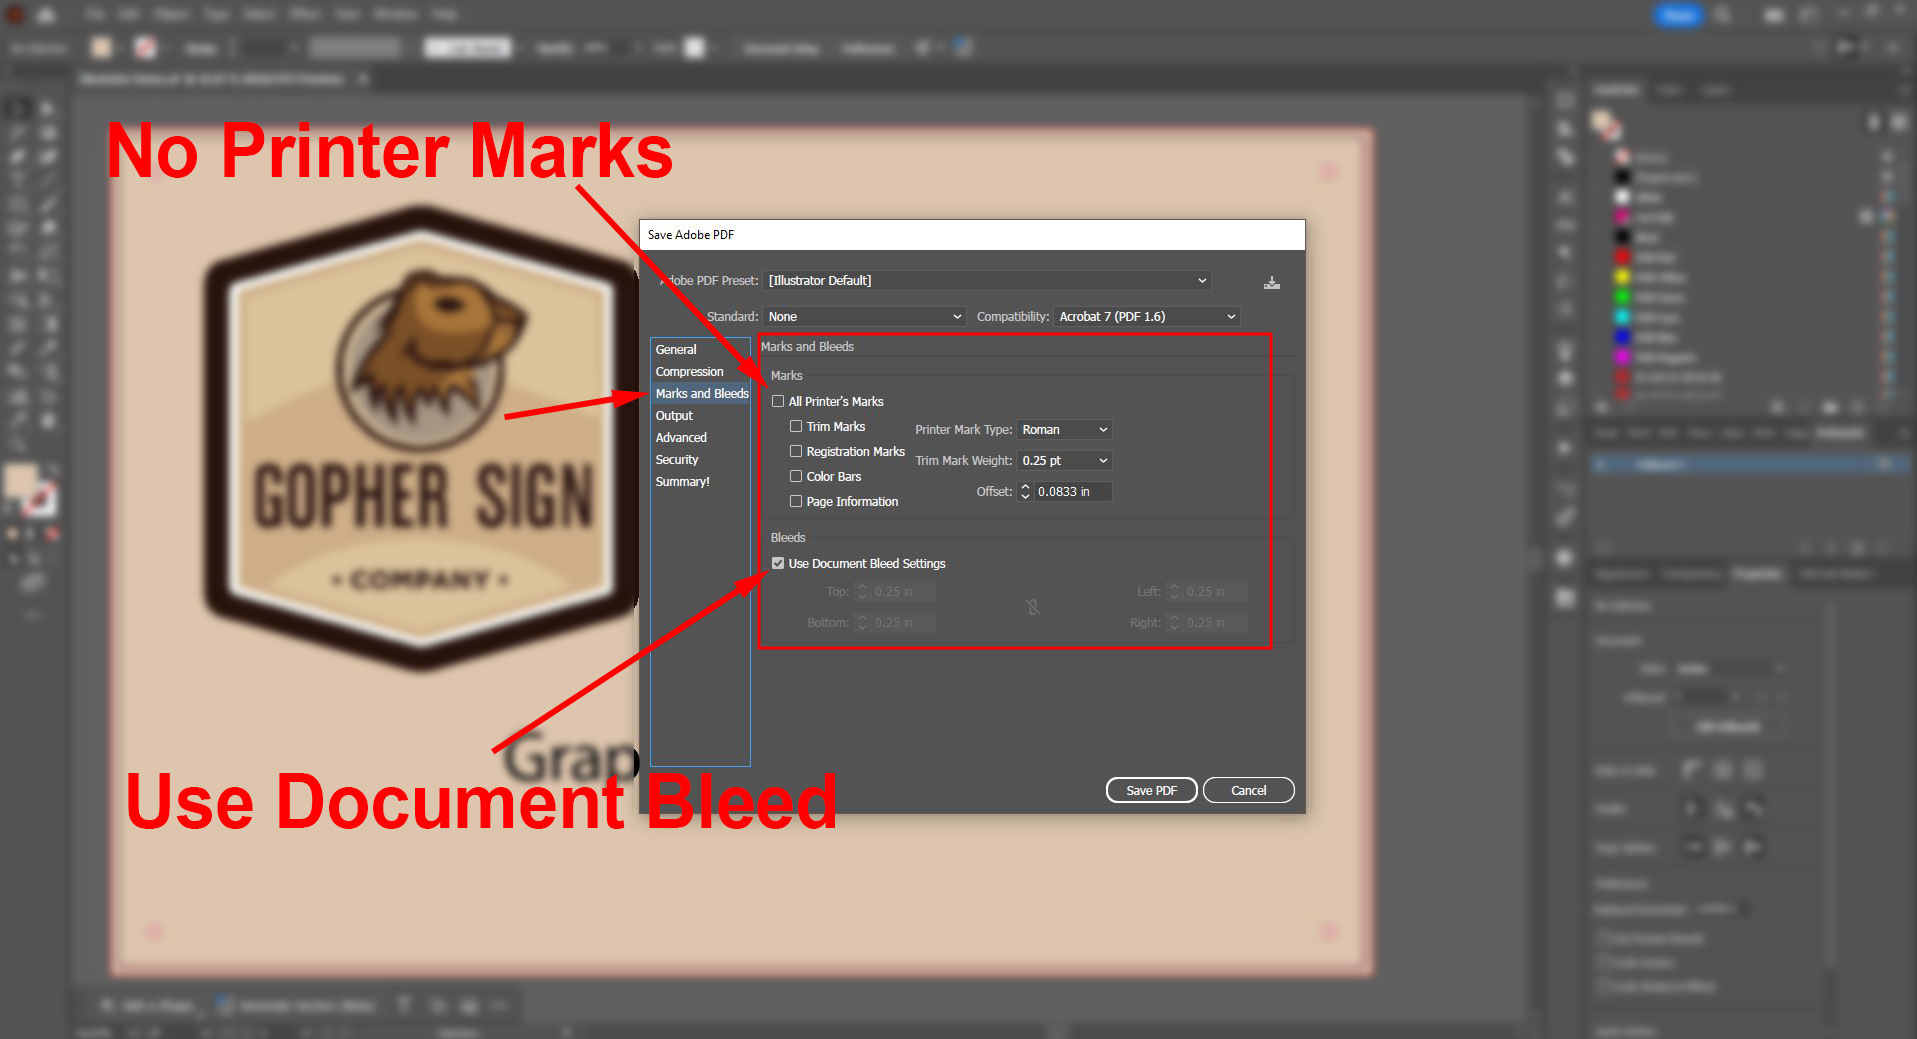
Common reasons that we will reject a file for would be missing Spot Color “Cut Path” within the file, missing hole/stud locations, lack of or excessive bleed beyond cut path, printer marks were exported, and improper document size.
This example submission for a 10” x 8” panel shows zero Spot Colors, as well as incorrect document size. This would require a revision. Your Gopher Sign representative will reject the submission and request a new revision if needed. If you need to submit a new revision, simply upload the revised file and leave a message as to which one you’d like to use and which one you’d like to remove.
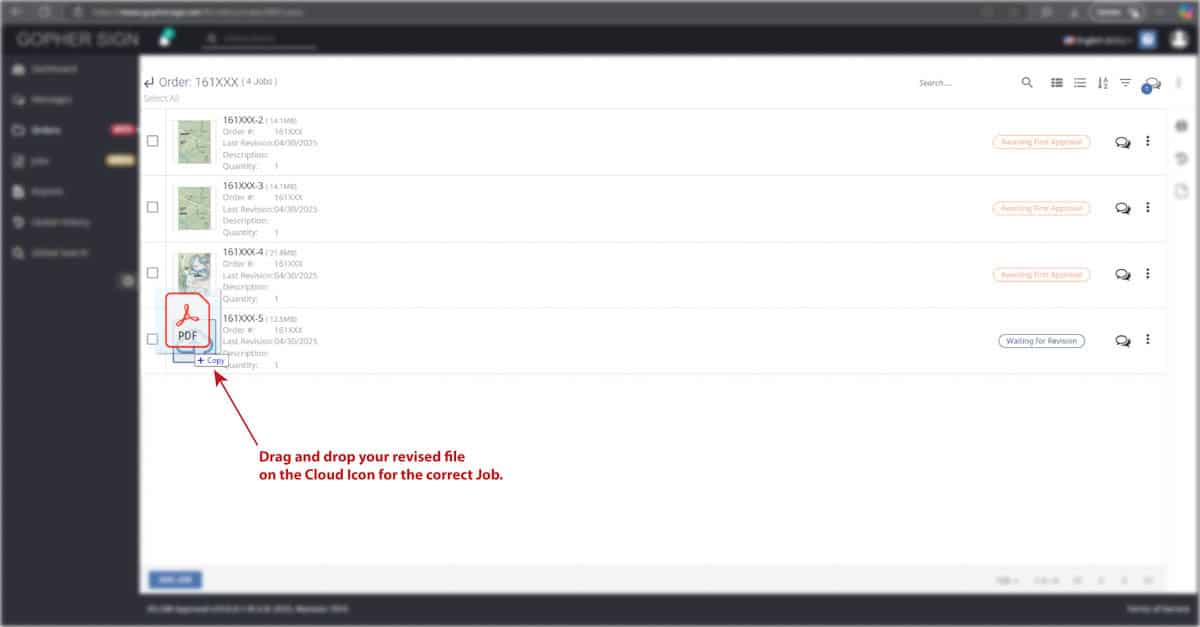
When we need user input, we will communicate that within the chat box for each Job. To submit a new file for a job that is Awaiting Revision, simply drag and drop your file onto the Job’s thumbnail box.
Once a revised file has been submitted, it will again be Awaiting First Approval by Gopher.
Here’s the Artwork Information for Revision 2, which now shows 1 Spot Color named Cut Path. The Document Size also shows the correct 10” x 8”. Perfect!
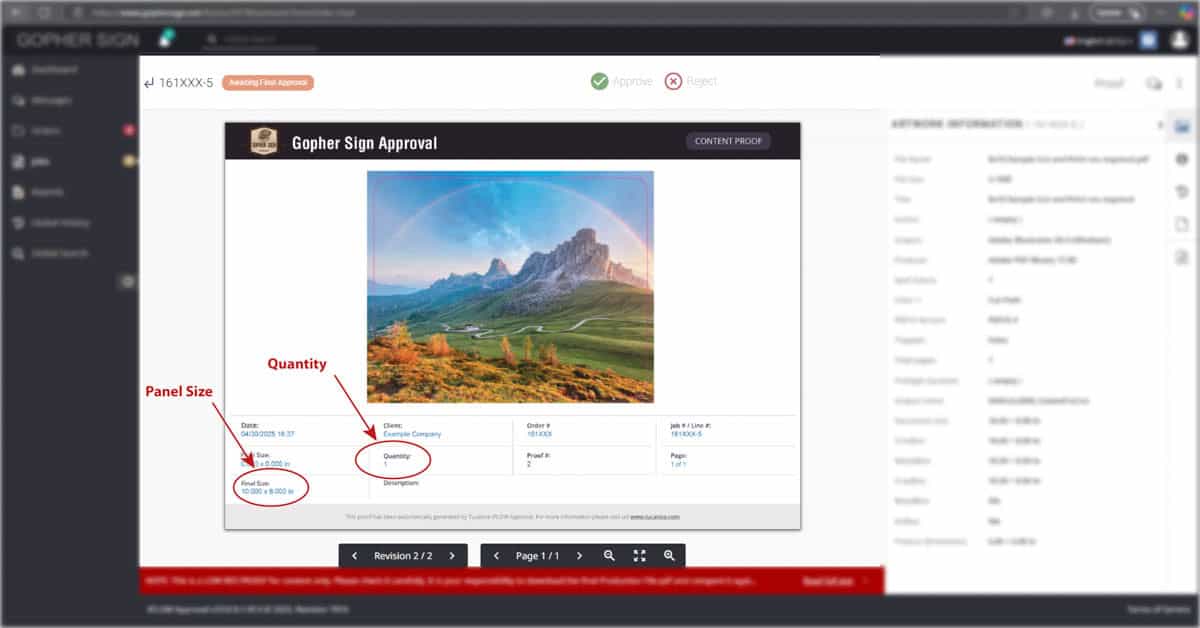
Once Gopher has reviewed and Approved your submission, your Content Proof is now available. This is your opportunity to verify the Document/Final size is your intended panel size, quantity, and all the elements of your art are as intended.
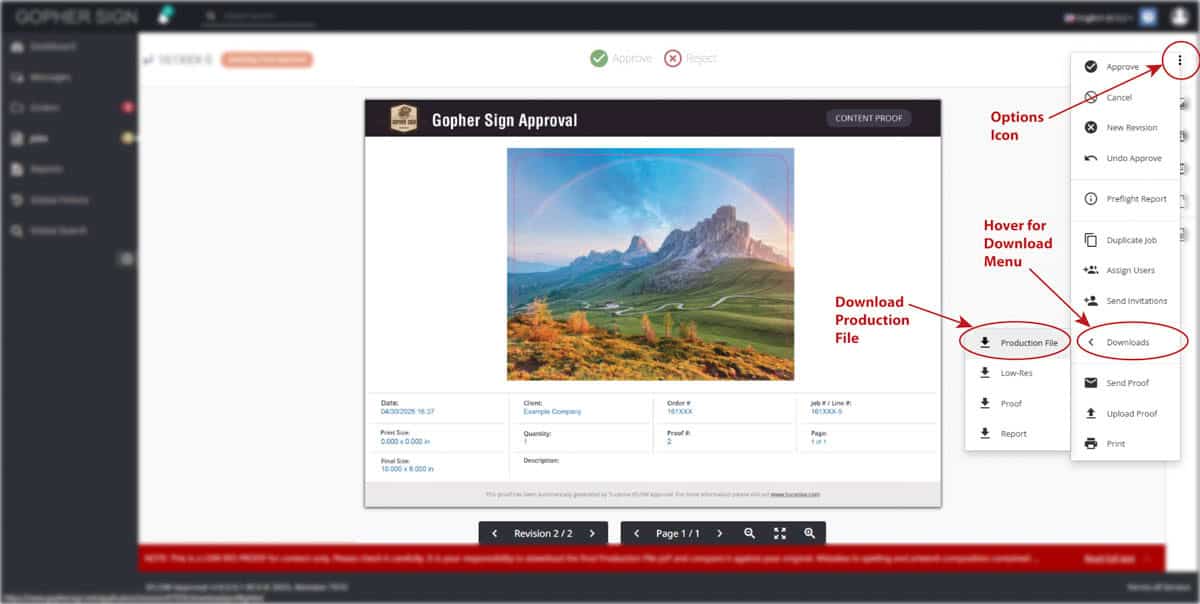
The Content Proof is low resolution, and not the final print file. We encourage you to download the Production file by clicking the Options Icon at the upper right, navigate to Downloads, and select Production File. This is the full resolution file that will be sent to Print Production. During that process, our automated workflow specifically separates out the Spot Color “Cut Path” and is the pattern for CNC cut file creation, as well as placement outline for the printing process. If your cut paths are not labeled correctly, they will not get removed and they WILL PRINT. We do our best on the front end to make sure that doesn’t happen, but that’s the importance of the specific Spot Color.
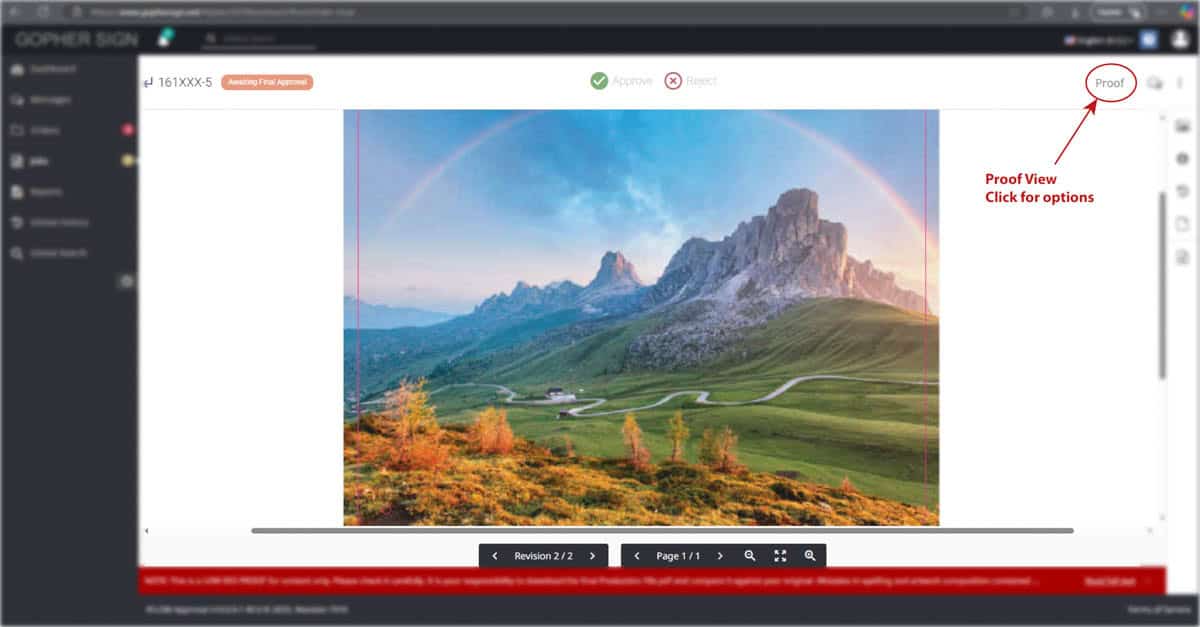
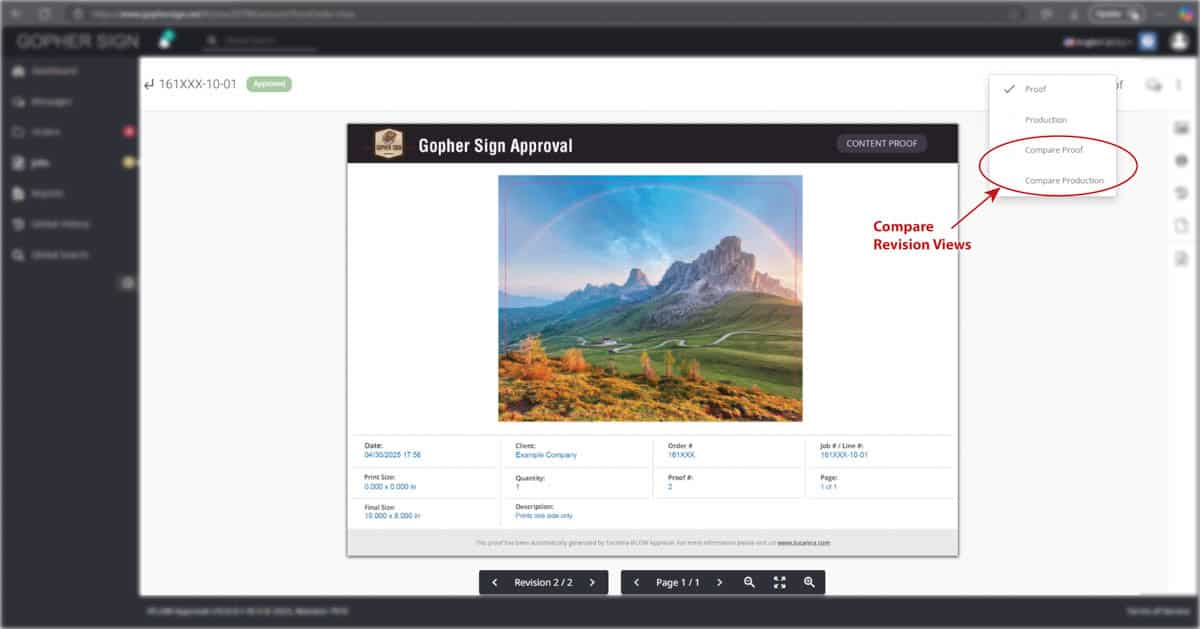
If you click on “Proof” at the upper right, there’s actually an option to switch the view from “Proof” to “Production”. That allows you to view the file in full resolution without downloading it.
Use the “Compare Proof” and “Compare Production” views to identify differences between the current and previous revision. This can be helpful to identify changes between revisions. At the bottom of the proof screen, you can switch between previous revisions. Each revision view gives you the opportunity to download the files specific to that revision.
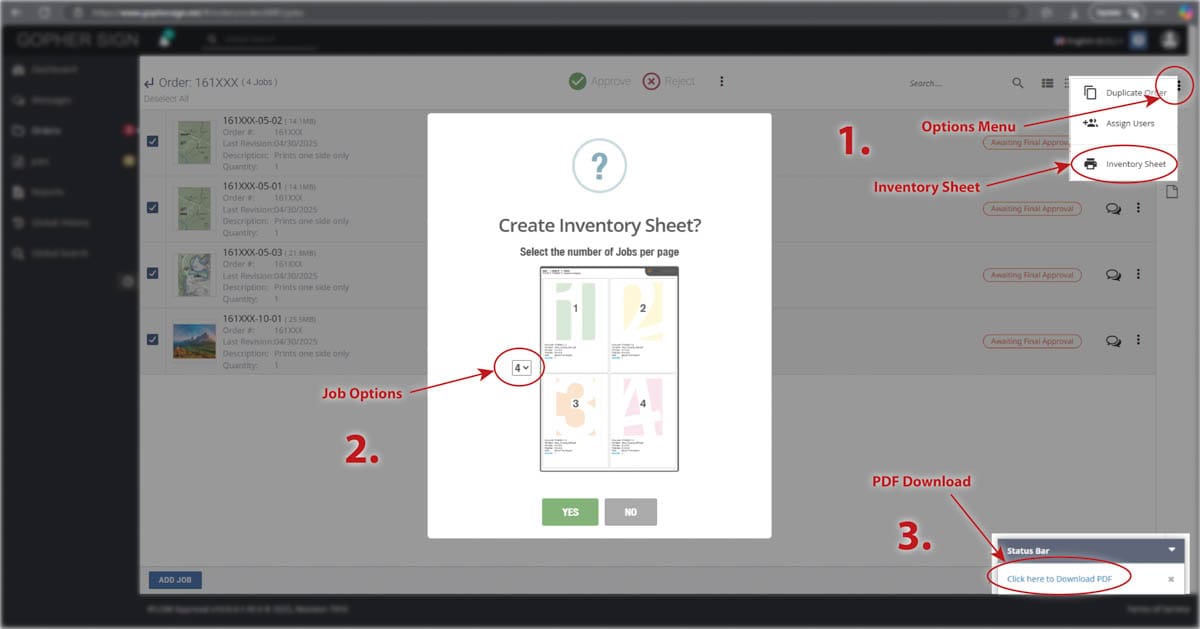
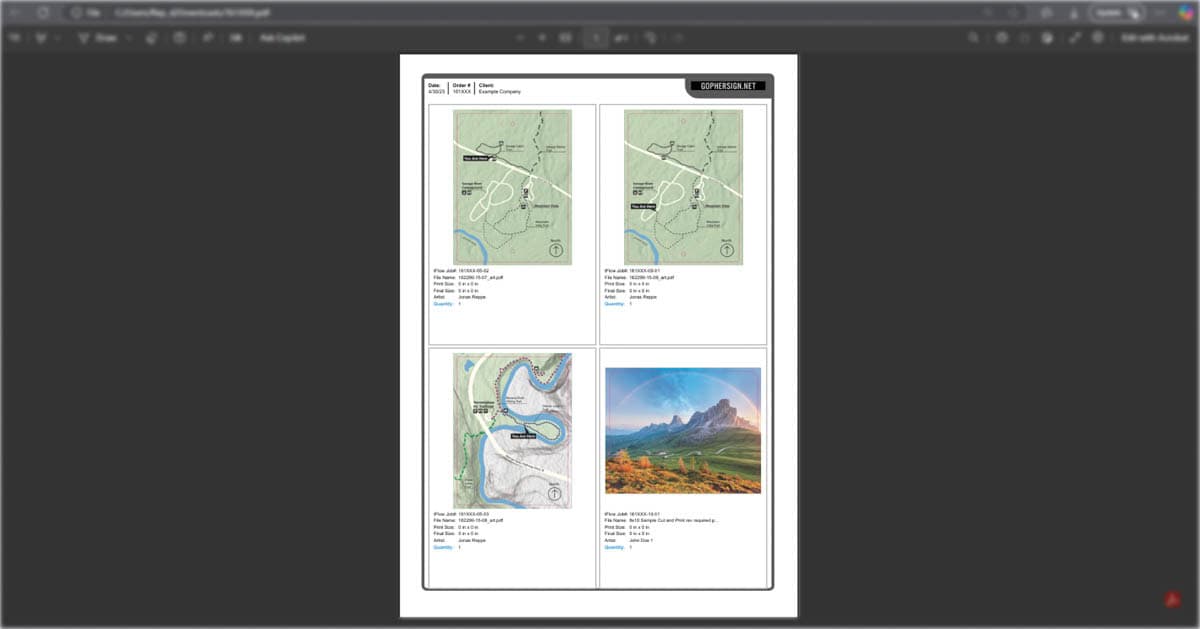
Other useful features can be found from the Order view when you click on the 3 vertical dot options menu at the upper right. You can assign additional users that exist within your company. New users must be added by your Gopher Sign representative. From that menu, you can also create an “Inventory Sheet” of your job proofs. Select how many proofs you’d like on each page and click “yes”. A PDF will be generated, and a link will show at the lower right of the screen when it’s ready. It’s a clean, condensed way to summarize the jobs in your order.
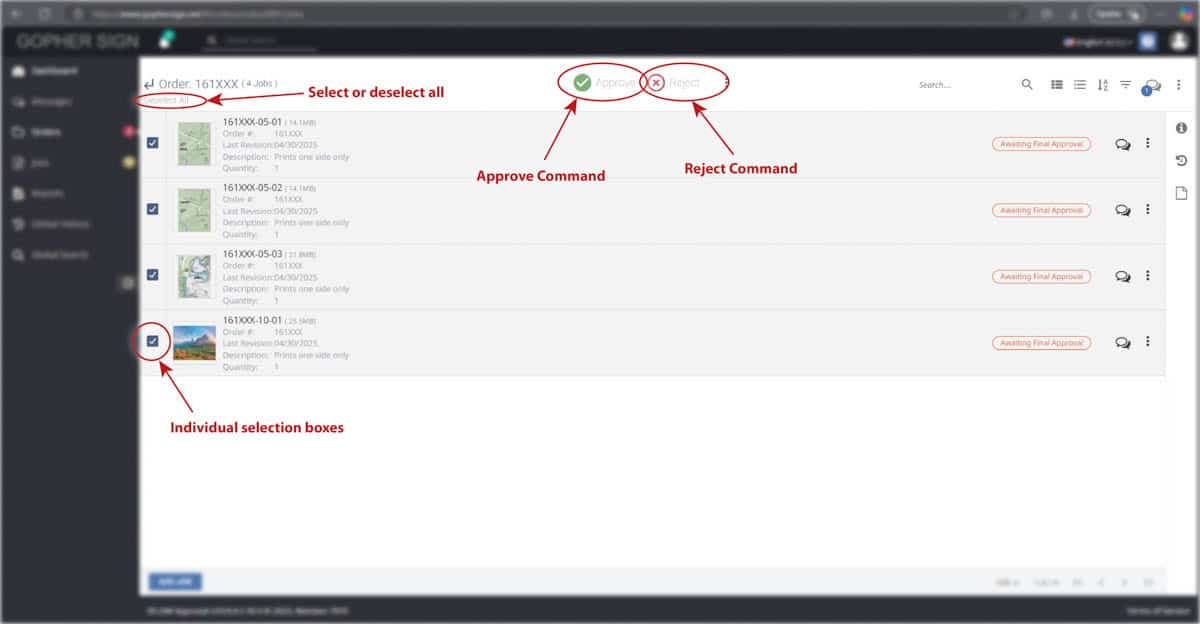
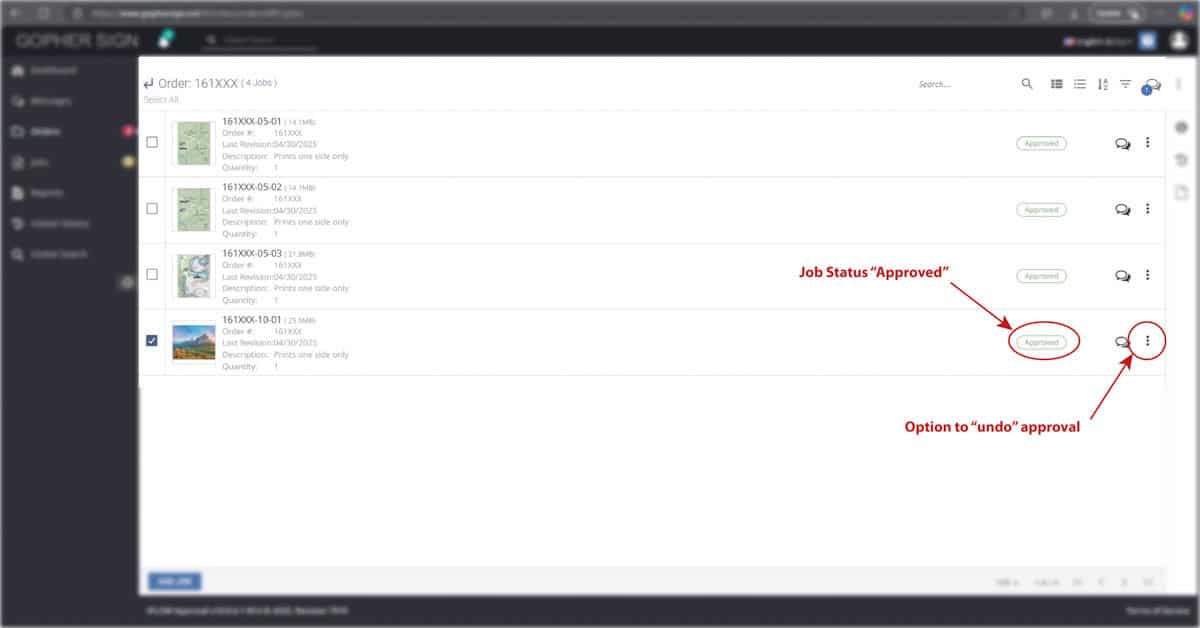
You have the option to reject a job file and upload a revision after Gopher makes the first approval. Once you’re happy with the jobs, you can give the Final Approval. You can do this from each Job screen or select multiple jobs from the order screen to approve more than one at a time.
After approving a job, you do have the ability to “Undo Approval” if you notice an error. Select the job and use the three vertical dot “Option” icon to do so.
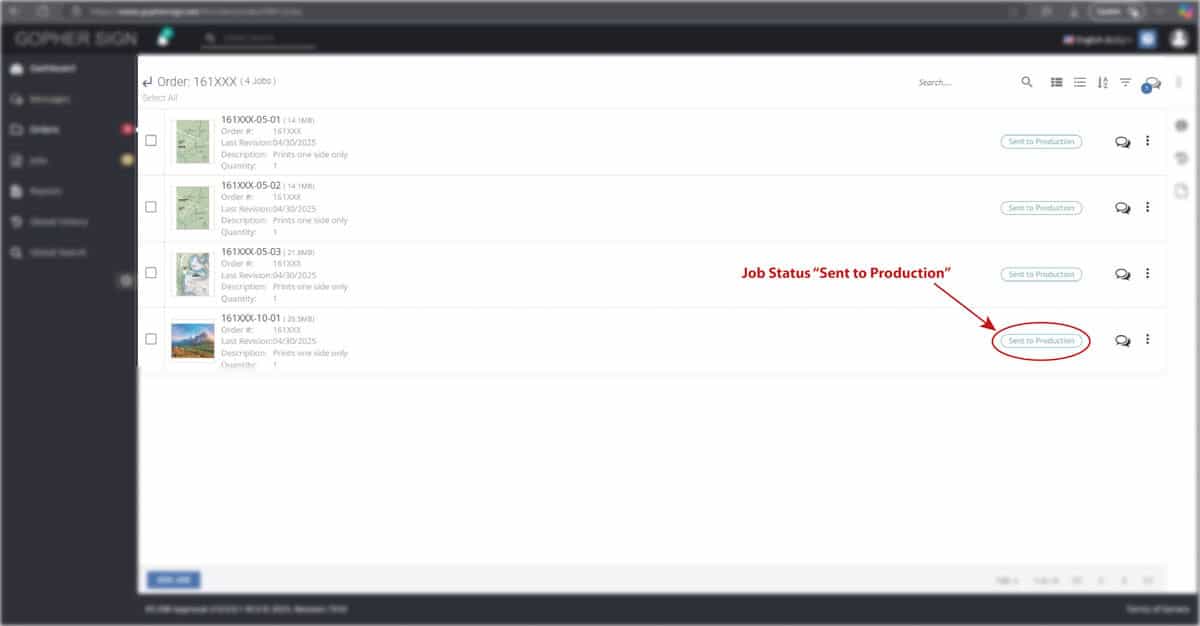
Once all Jobs are approved, Gopher will take the final action to Send the files to Production. This will push the file to our print queue where it gets separated into a Cut Path template and Print File. The Order is then scheduled into our manufacturing calendar, and an Order Acknowledgement is generated and sent to the default email address on your company’s account. That Order Acknowledgement shows the Estimated Ship Date for your project.
Your current and previous orders will forever be available at www.gophersign.net
You can always connect with a Gopher Sign representative via the chat box feature with any questions or via email to art@gophersign.com for support with the art workflow. We’re here to ensure your project get produced as intended and delivered on time.
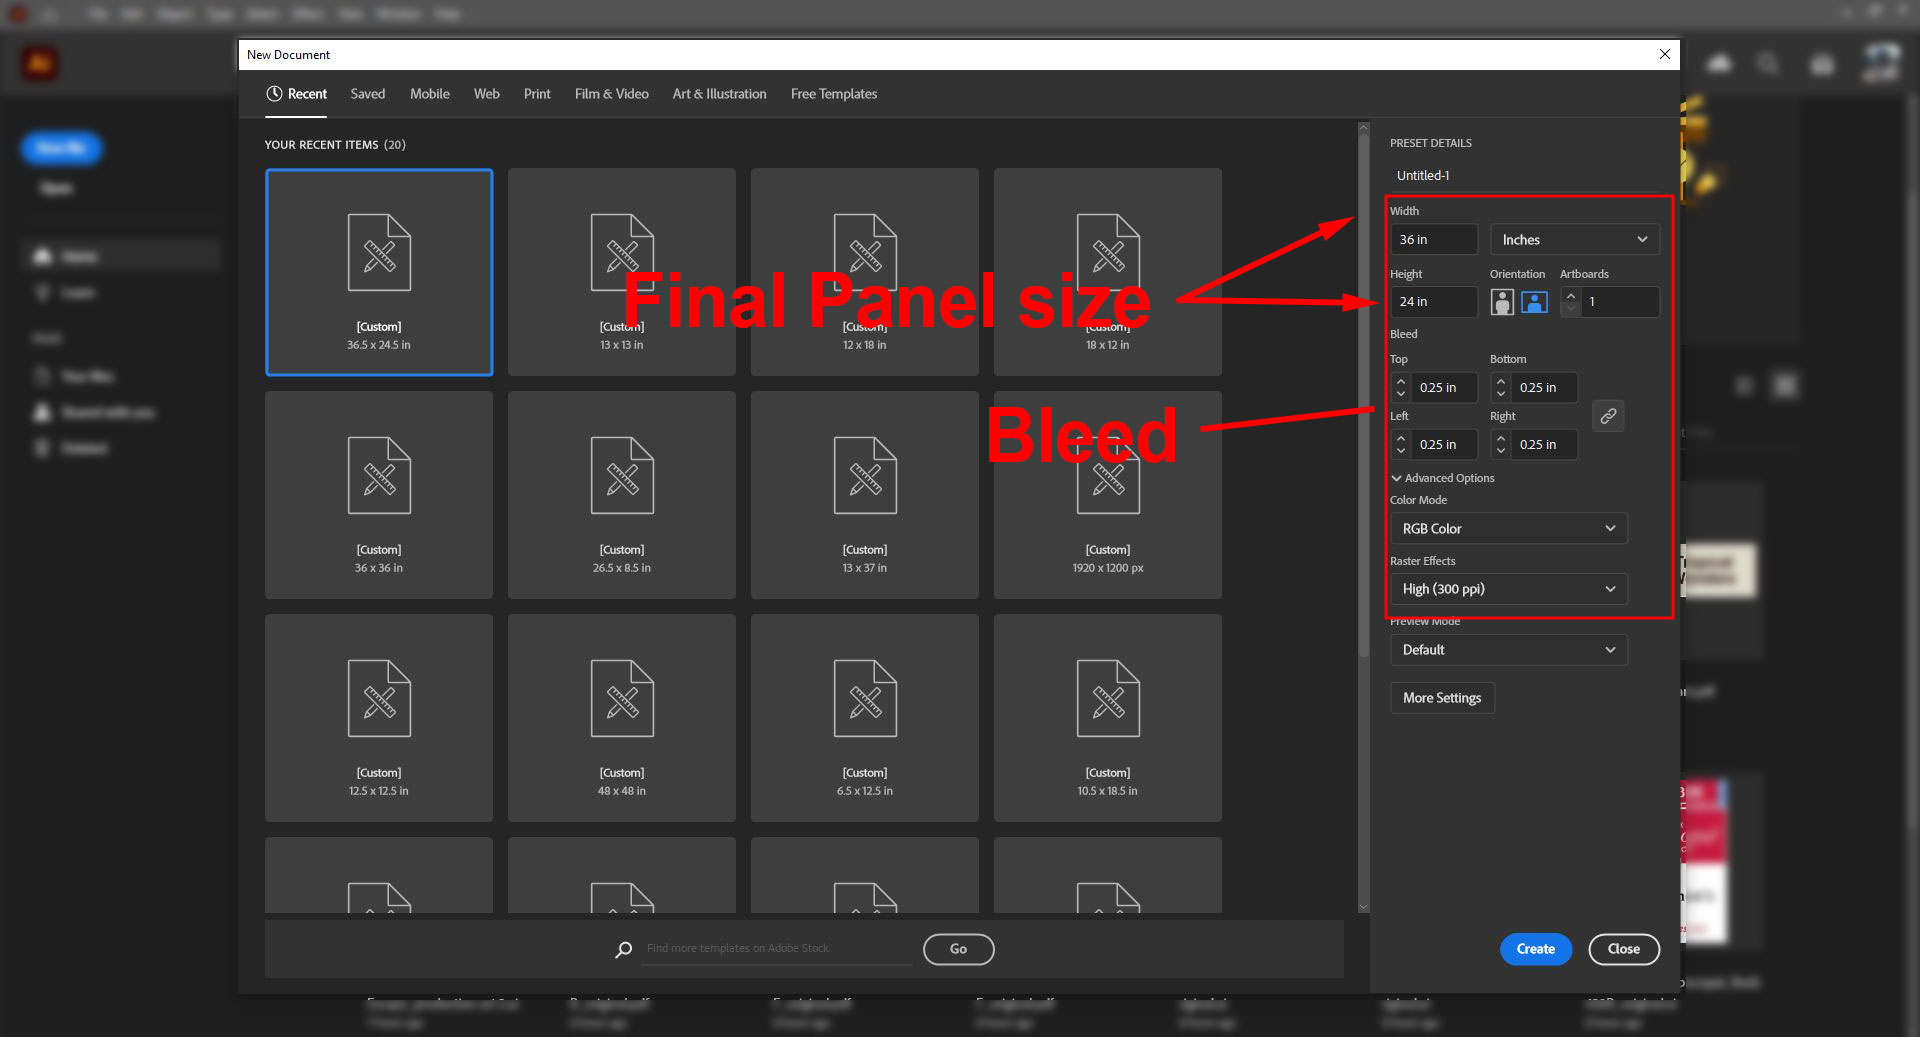
When you create your document, set your document size to the final panel size for both width and height. Set the Bleed to 0.25″ all around. While we print in CMYK color space, RGB has a larger available color gamut to work with. Our RIP software does the heavy lifting to convert to a compatible final print formula. The raster effects should be at the High setting of 300 ppi.
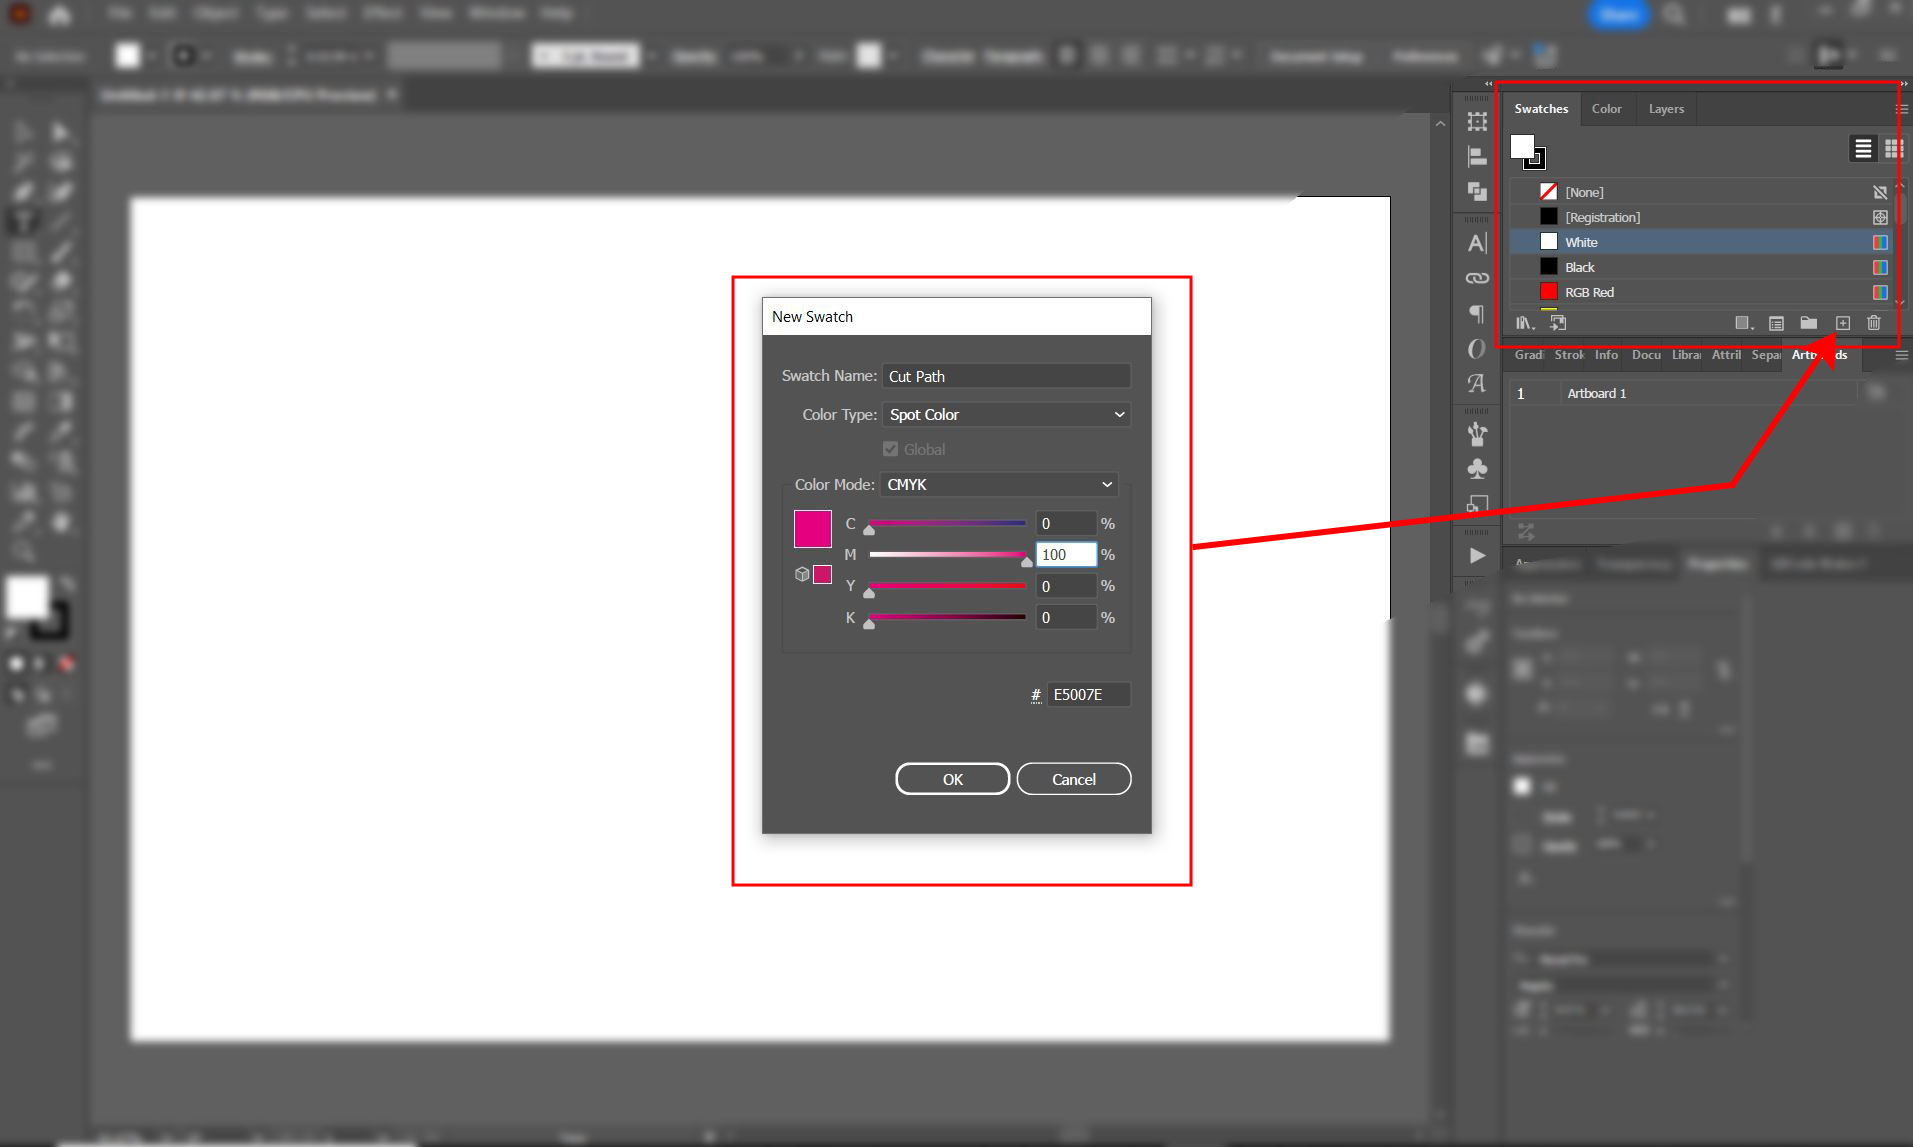
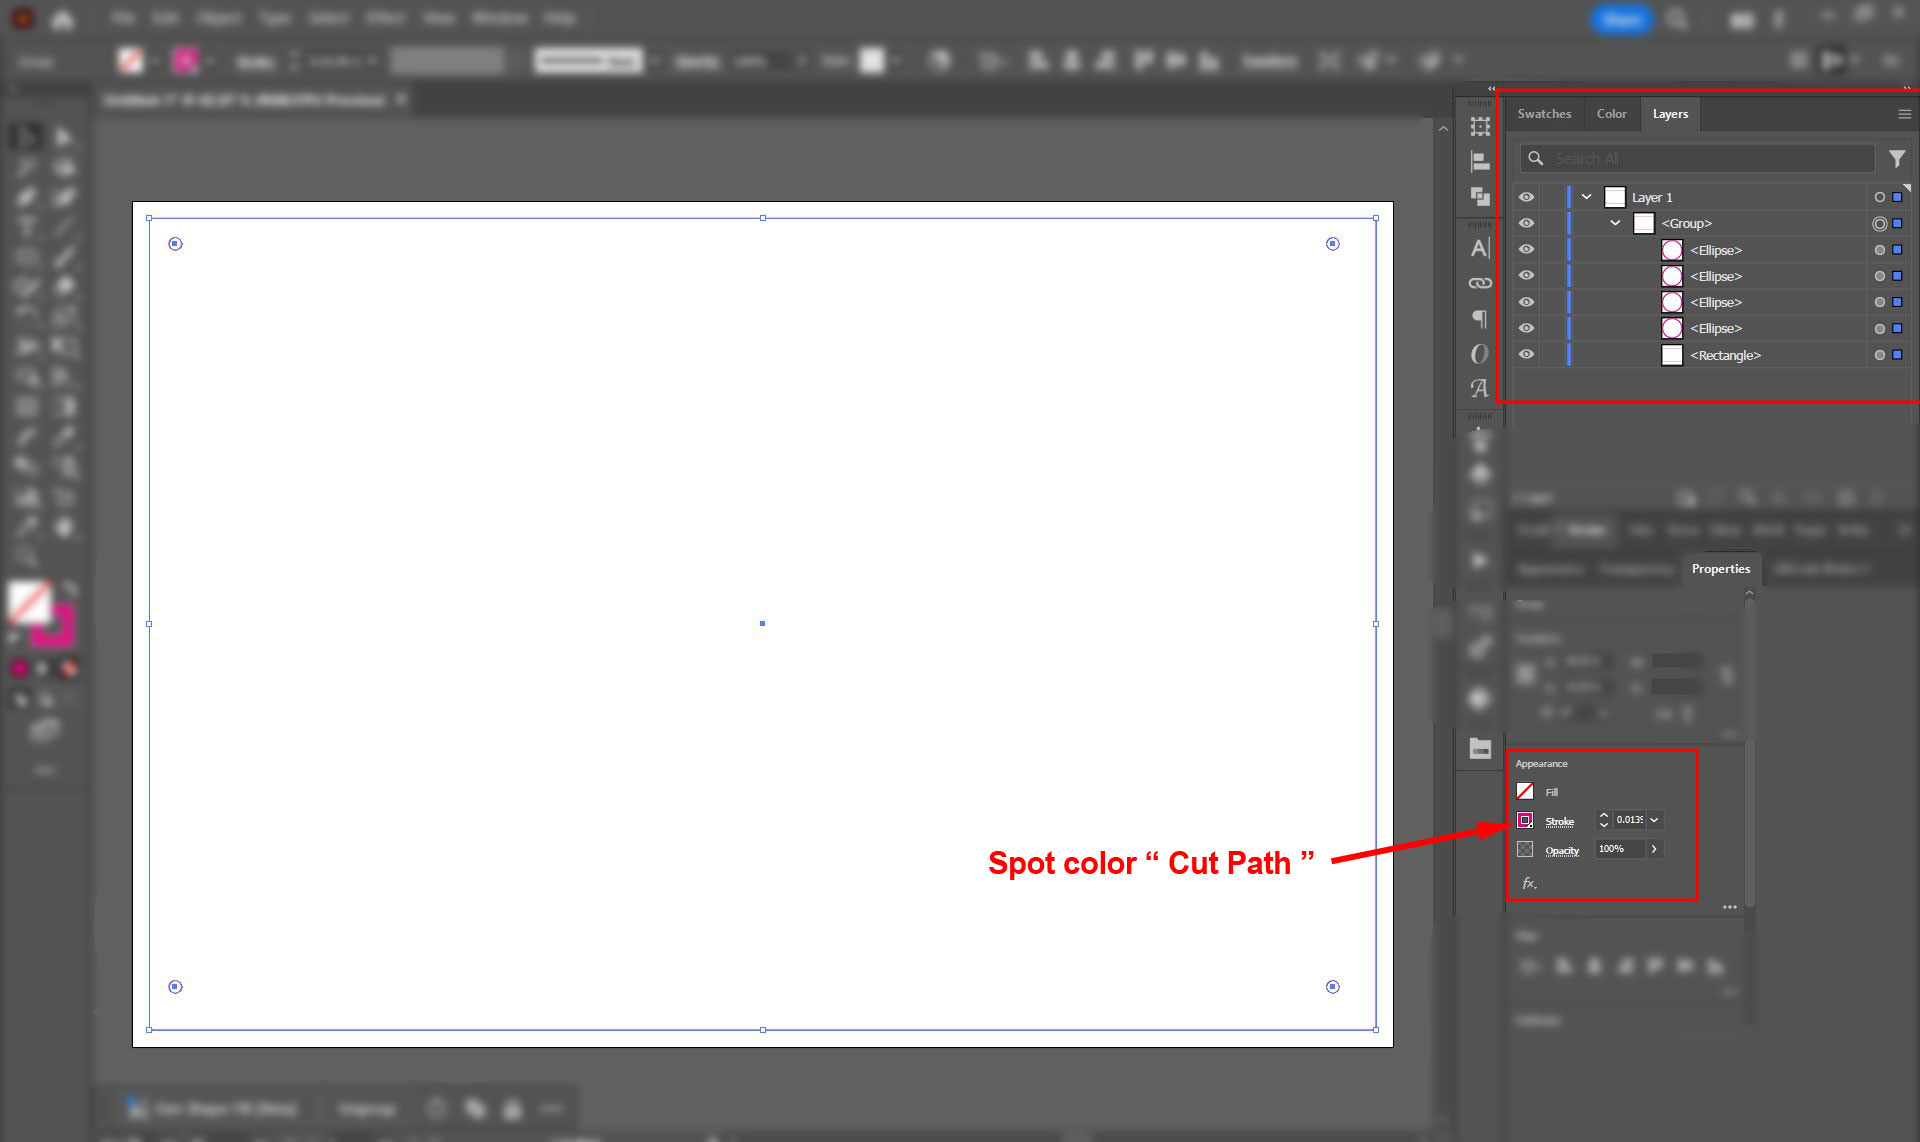
Cut Paths are an important part of the file, it allows you to control the size and shape of the final panel. It also allows you to place mounting holes and features where you need them to be. This is achieved by creating a spot color named “Cut Path”. Our automated software separates that spot color out for use during the CNC cutting of the panel blanks, and removes it from the final print file. This spot color WILL NOT PRINT on the panel.
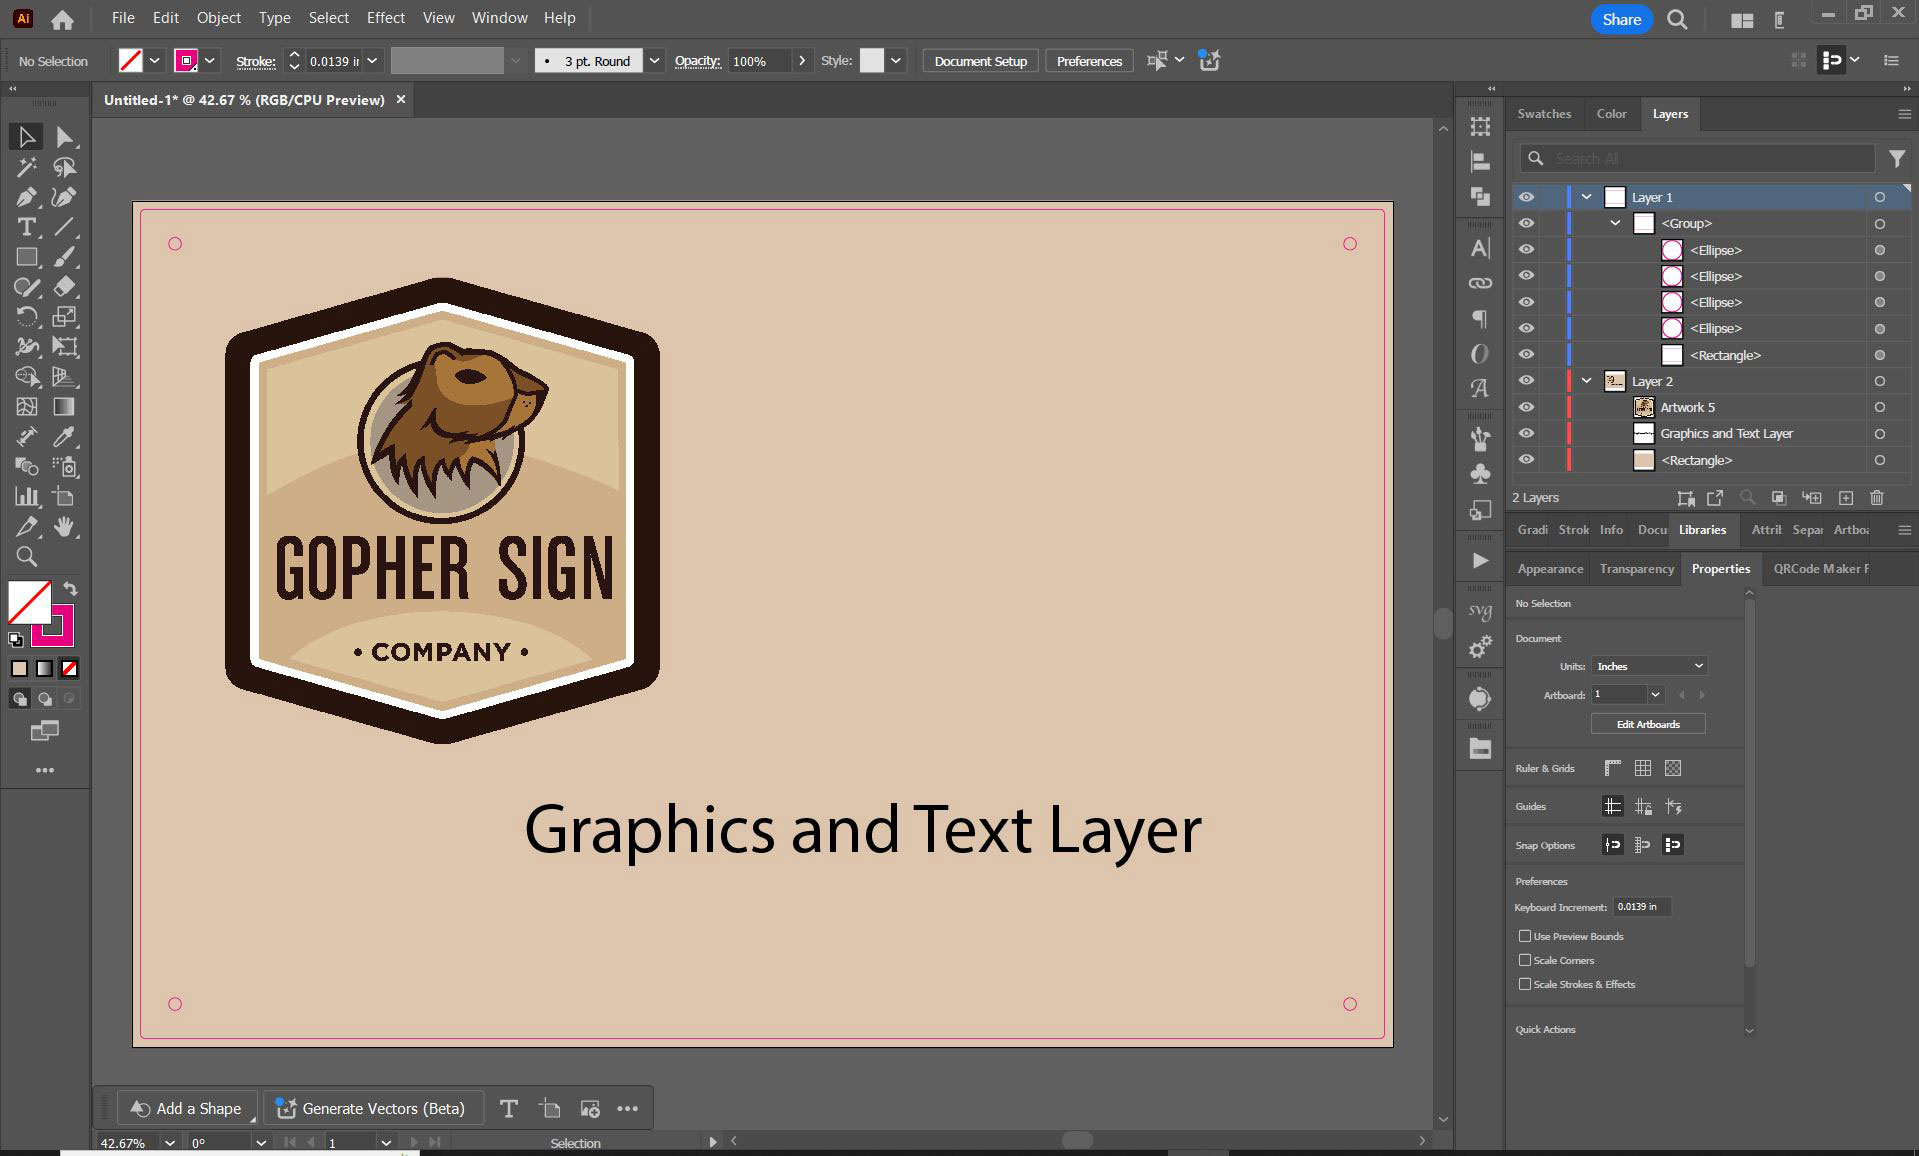
Set your cut path shapes and holes to a 1 point (0.0139″) stroke using the “Cut Path” spot color you created. Group them together in their own layer and center the group vertically and horizontally in relation to the art board.
3/8″ studs must be indicated by 2.04″ diameter
1/4″ studs must be indicated by 1.29″ diameter circles
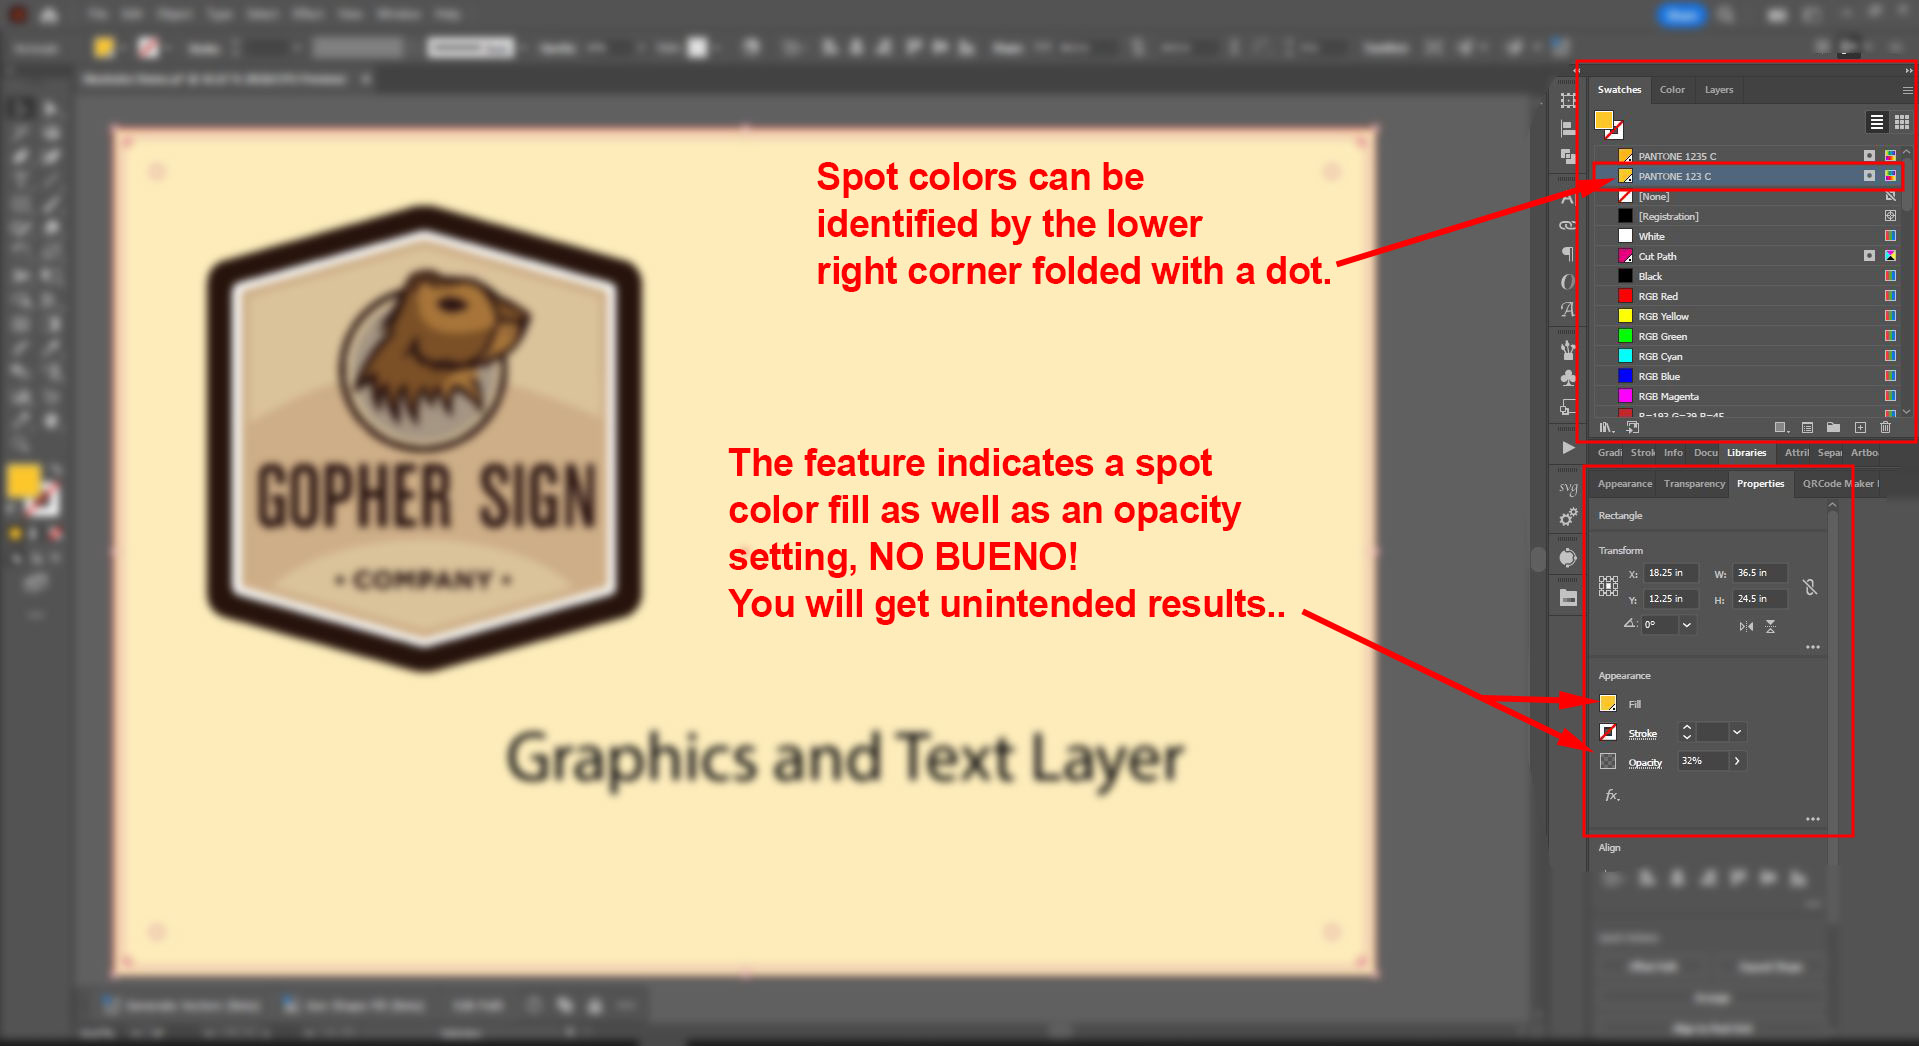
Important note about spot colors, our RIP software recognizes and matches Pantone spot colors when they have the full naming convention “PANTONE 123 C”. A spot color short named like “PMS 123 C” will not be recognized, and will be converted to CMYK.
Transparencies should NOT be applied to spot colors. Illustrator warns that external programs will interpret the transparency different causing unexpected results to occur, and they do!
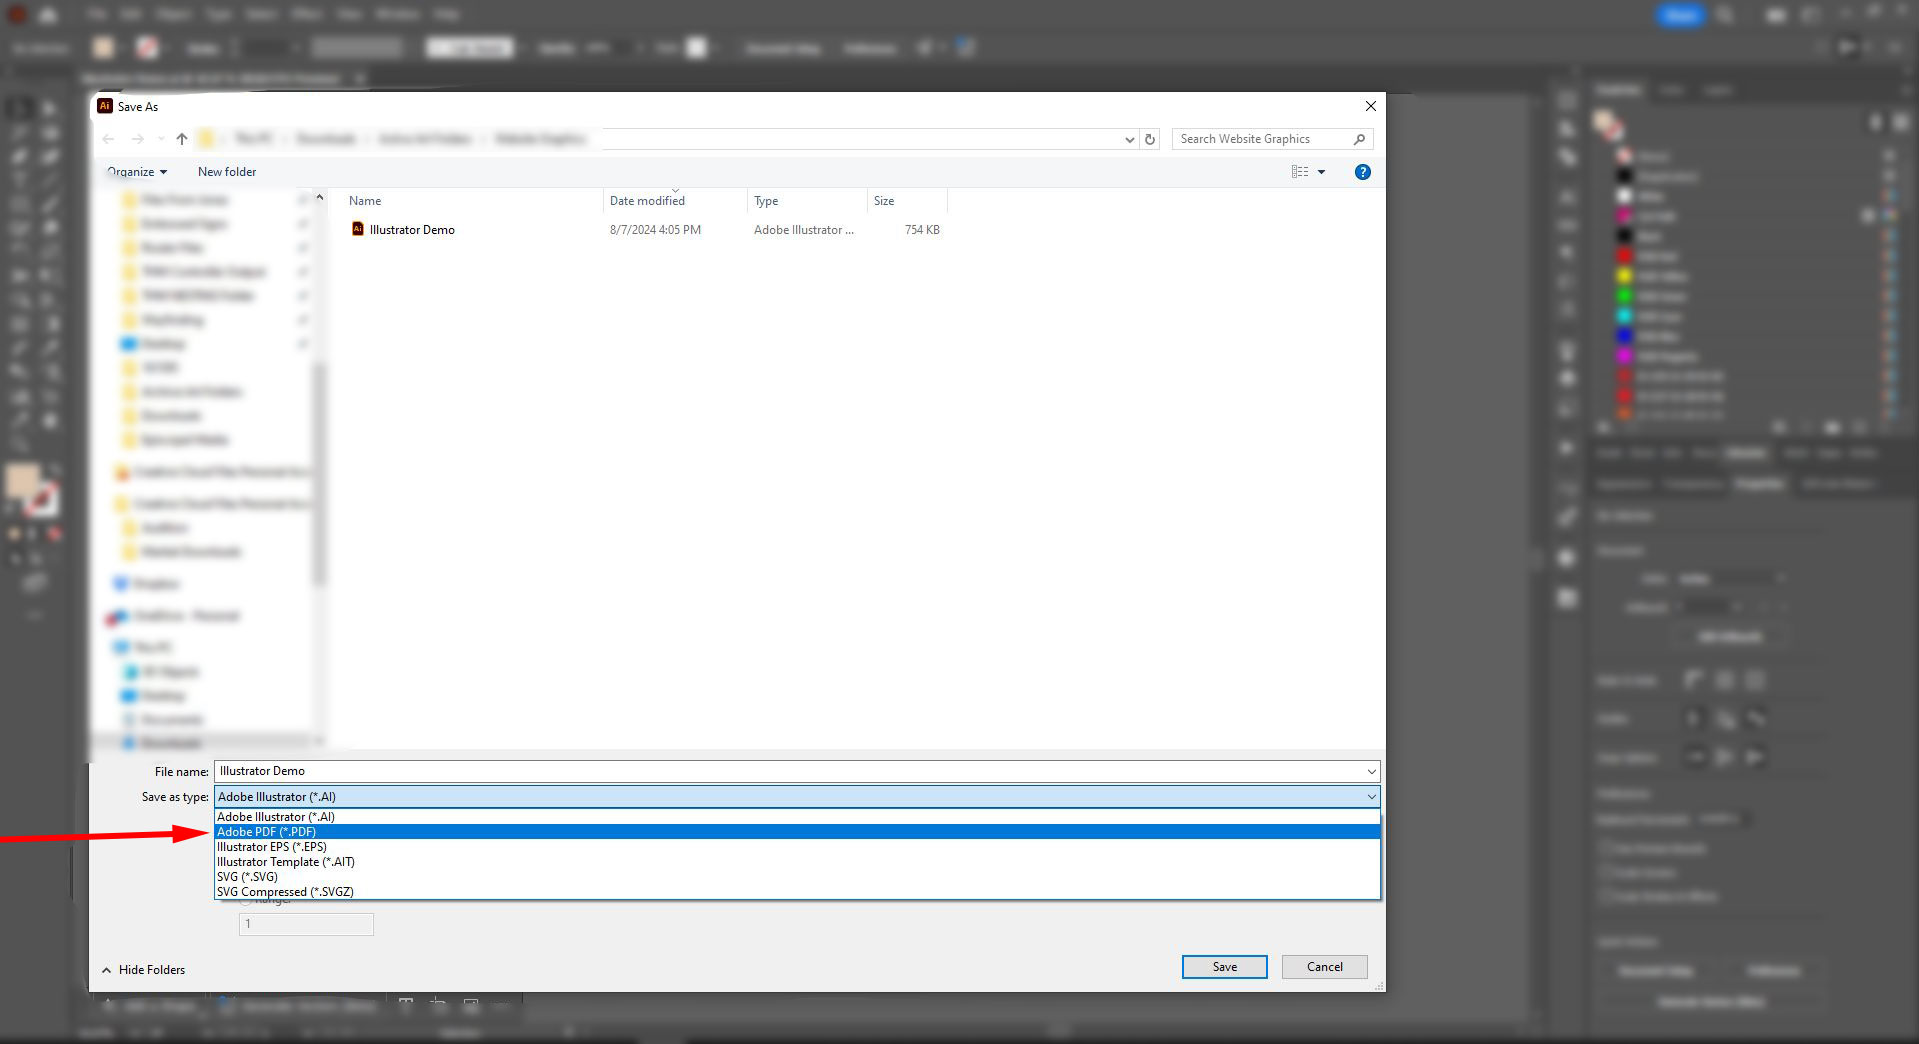
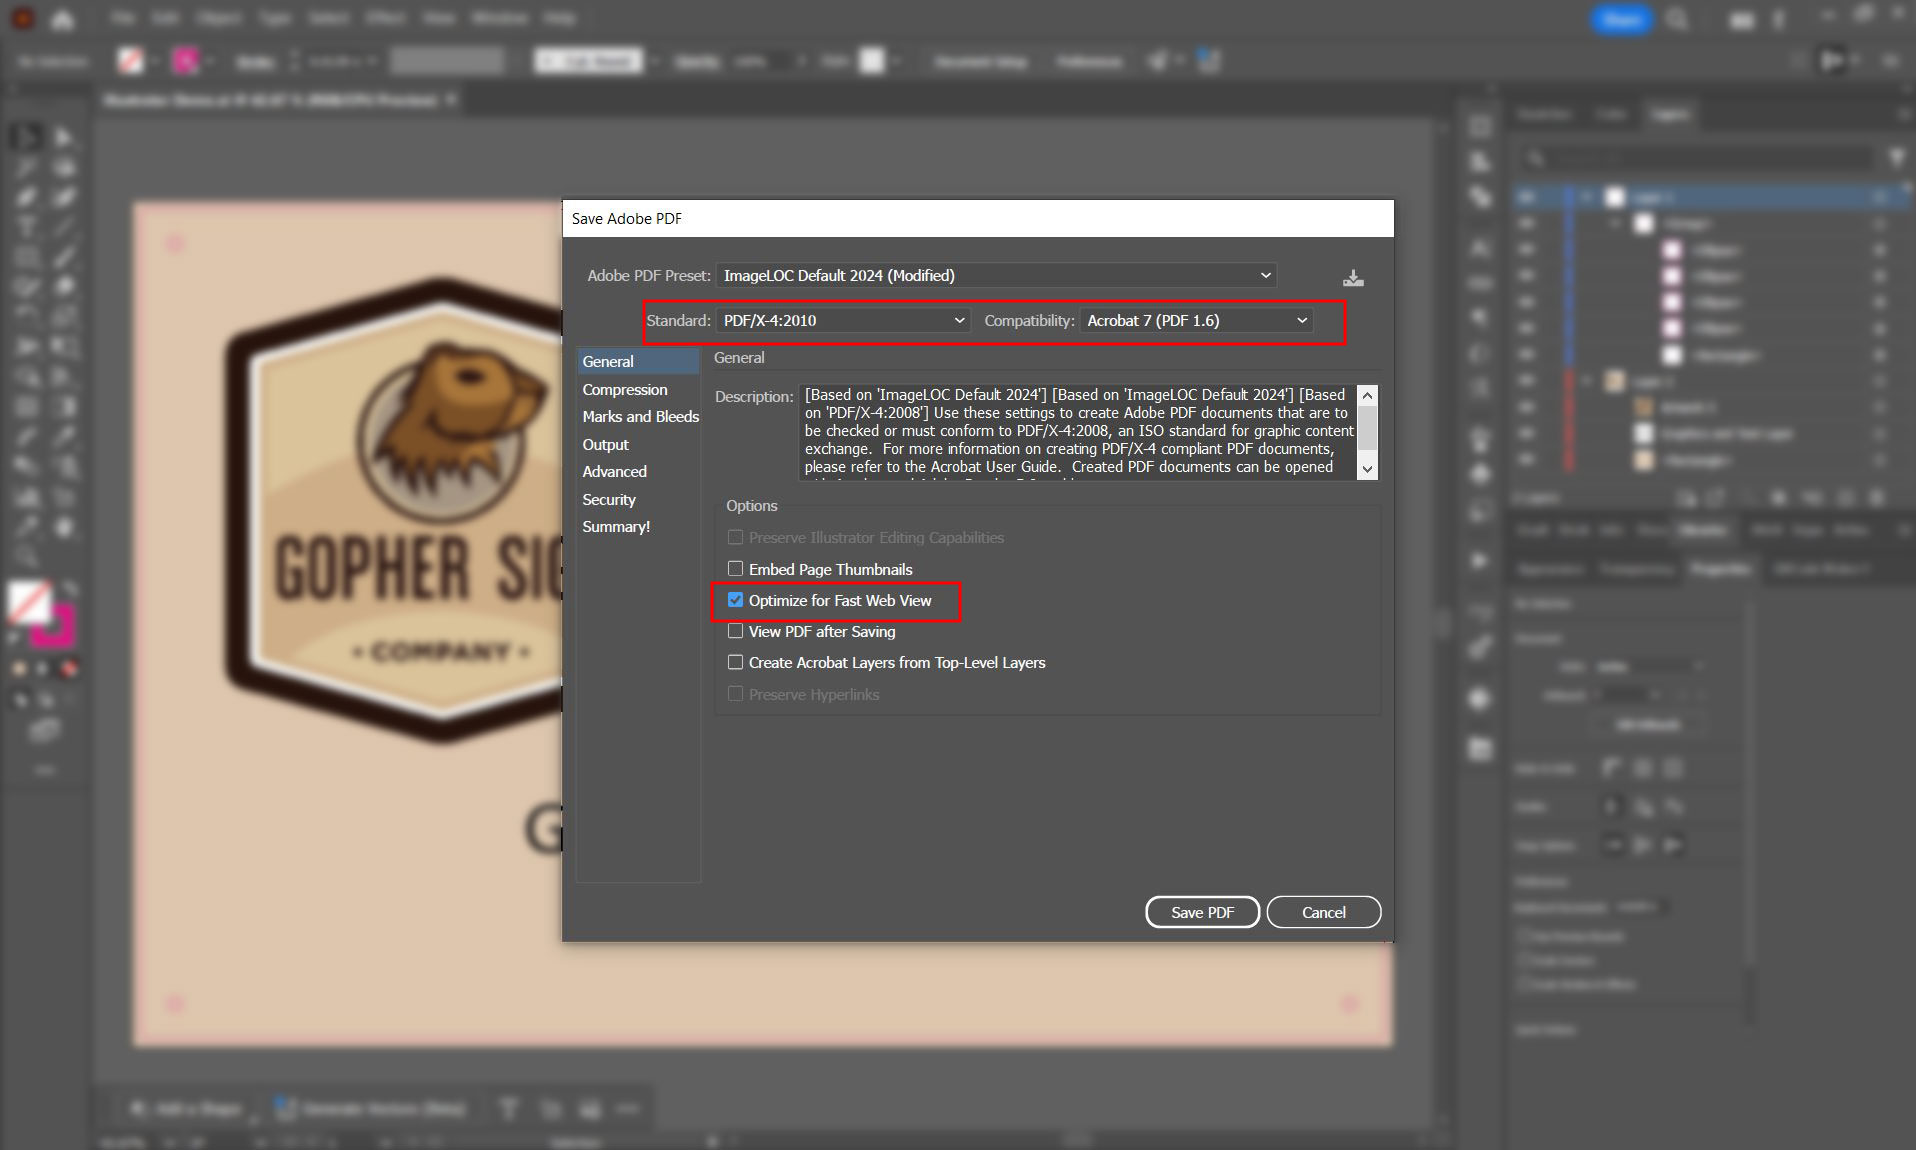
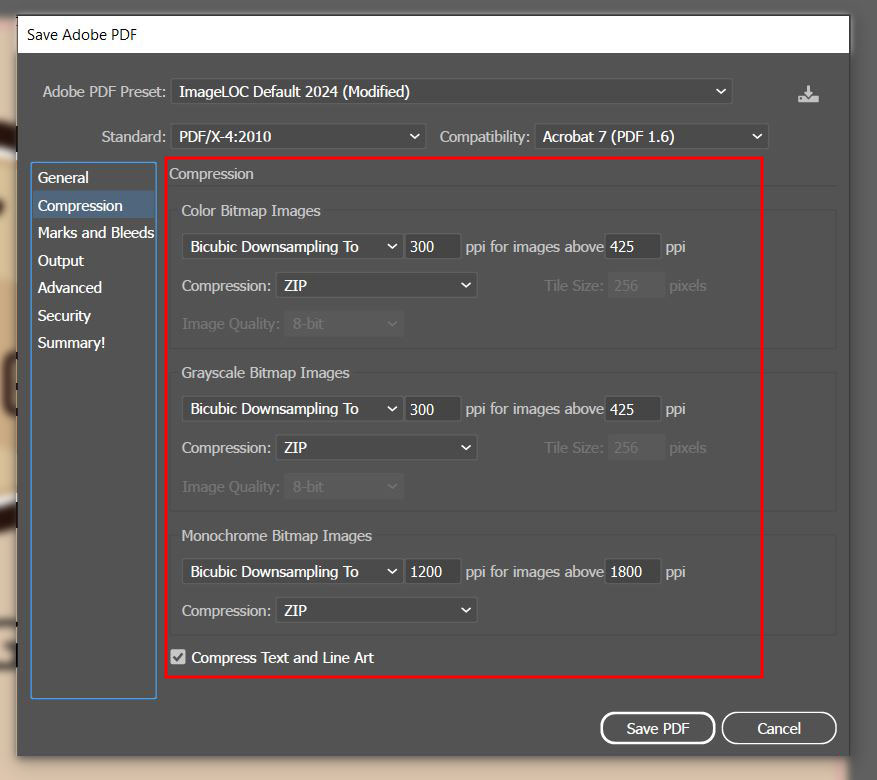
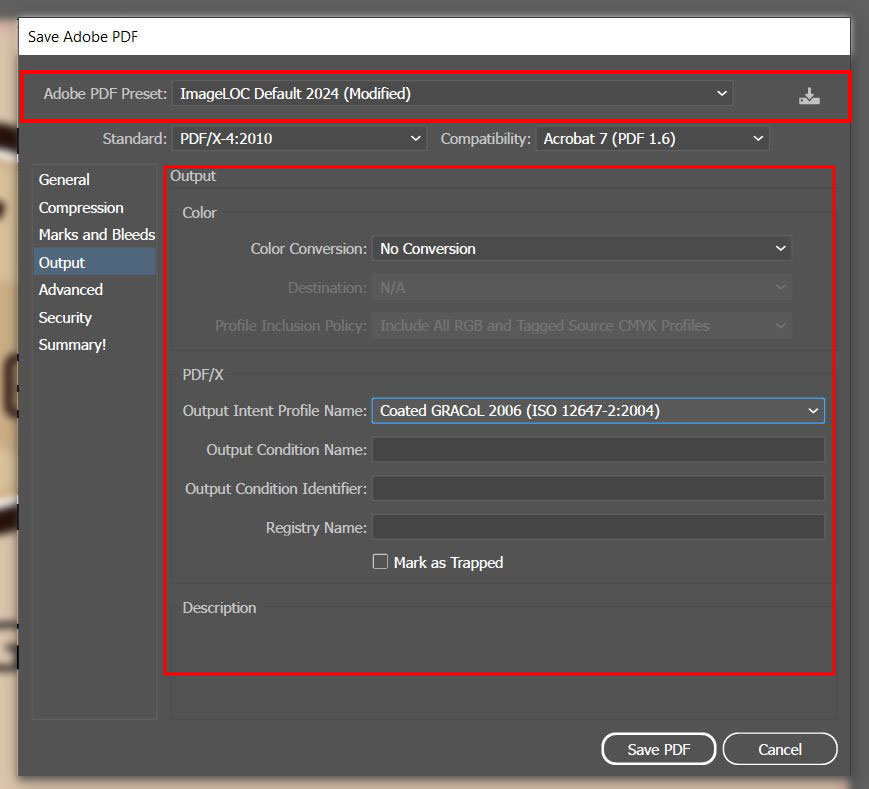
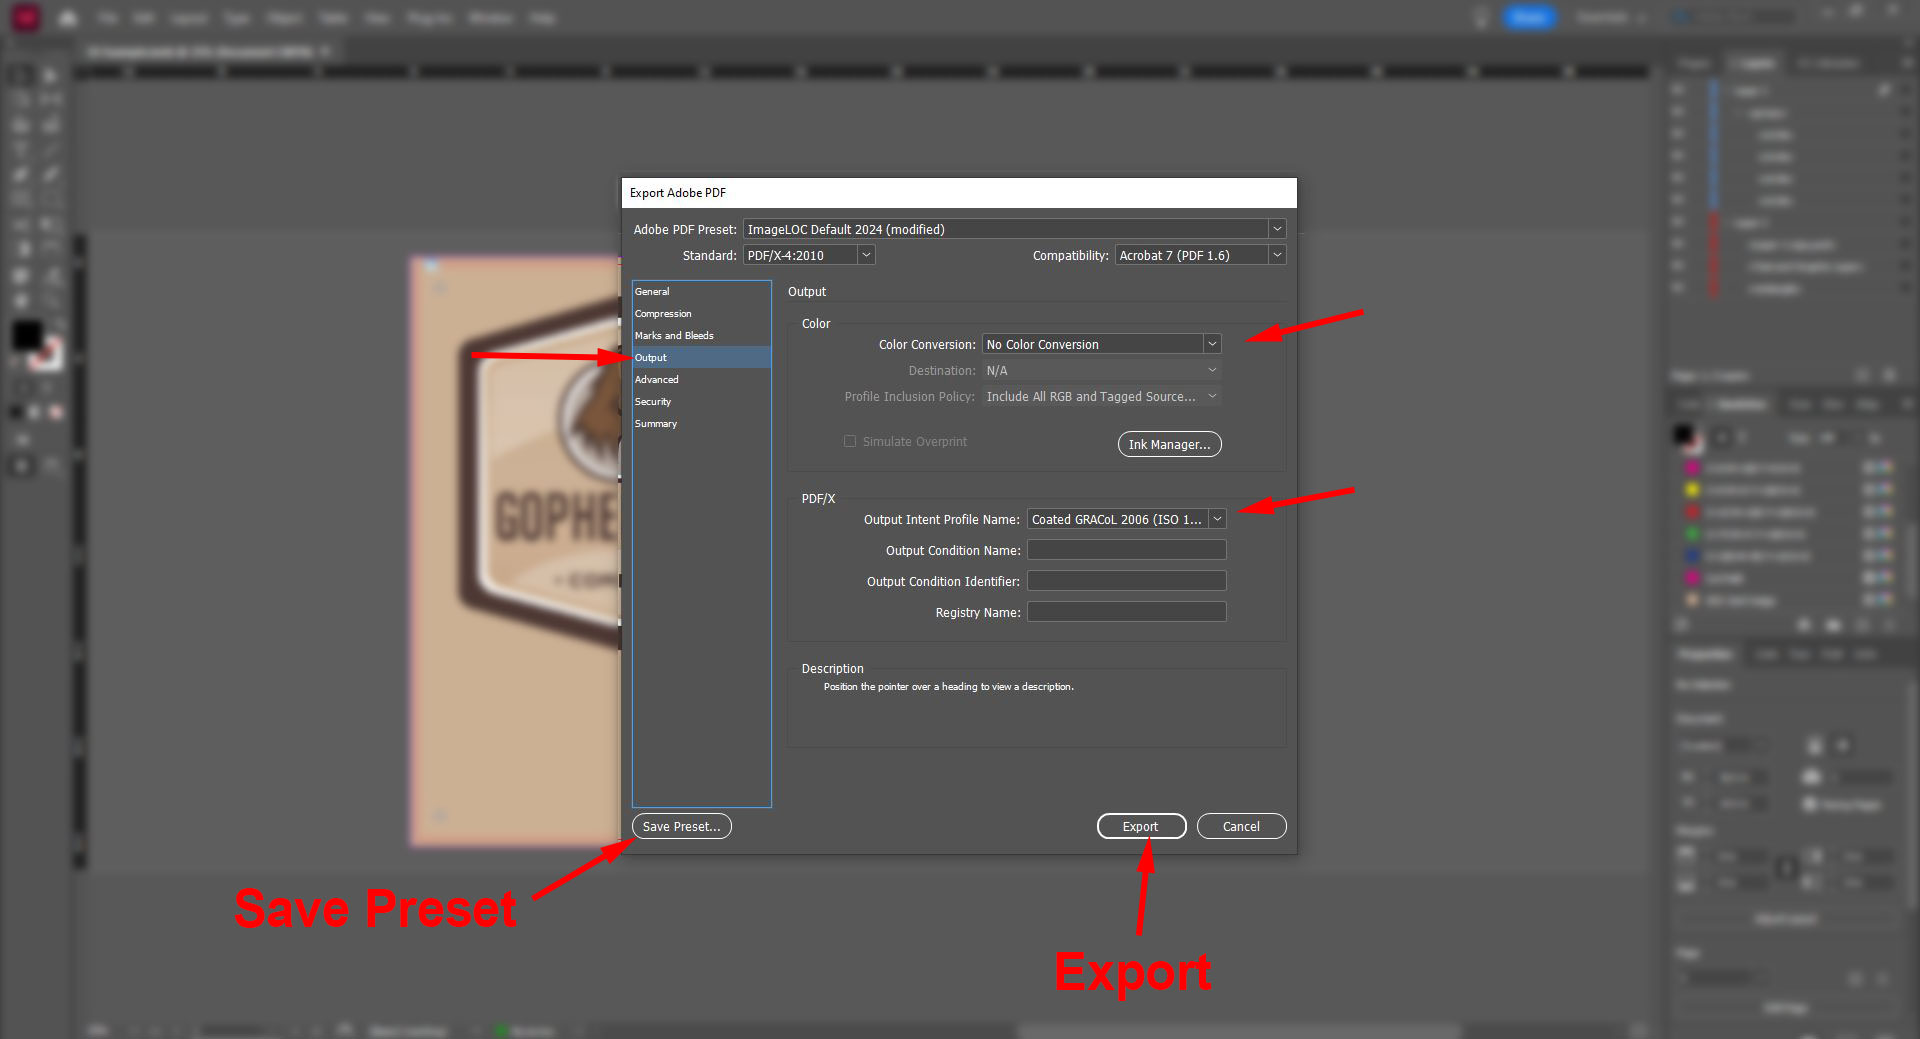
In the “Output” tab, select “No Conversion” for color output, and select “Coated GRACoL 2006” for Output Intent Profile. No settings in the Advanced, Security, or Summary tabs require adjustment. After you made all the adjustments in all the tabs, click the “save preset” button at the upper right and label accordingly. This will allow you to quickly and repeatably export your AI documents for optimum output. Click “Save PDF” to complete the export.
You now have a perfectly setup file for upload into our Art Portal!
Contact art@gophersign.com for questions.
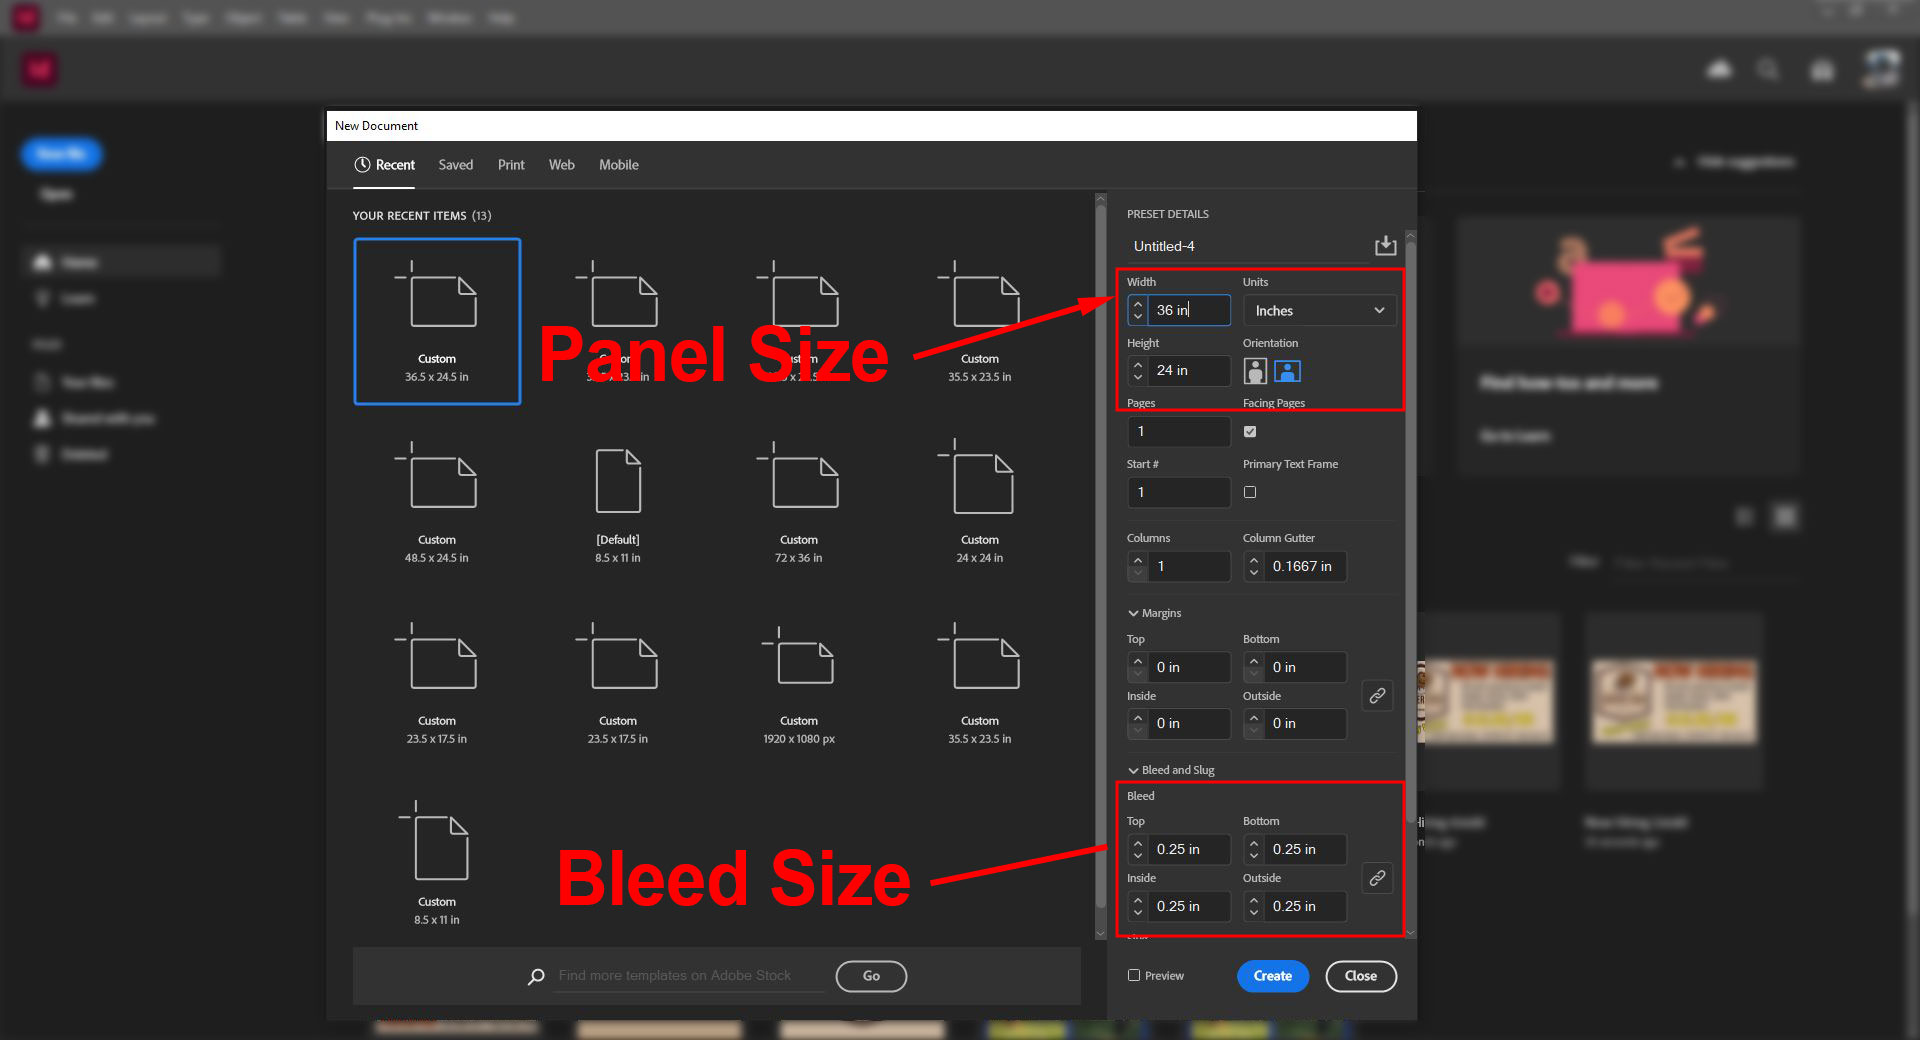
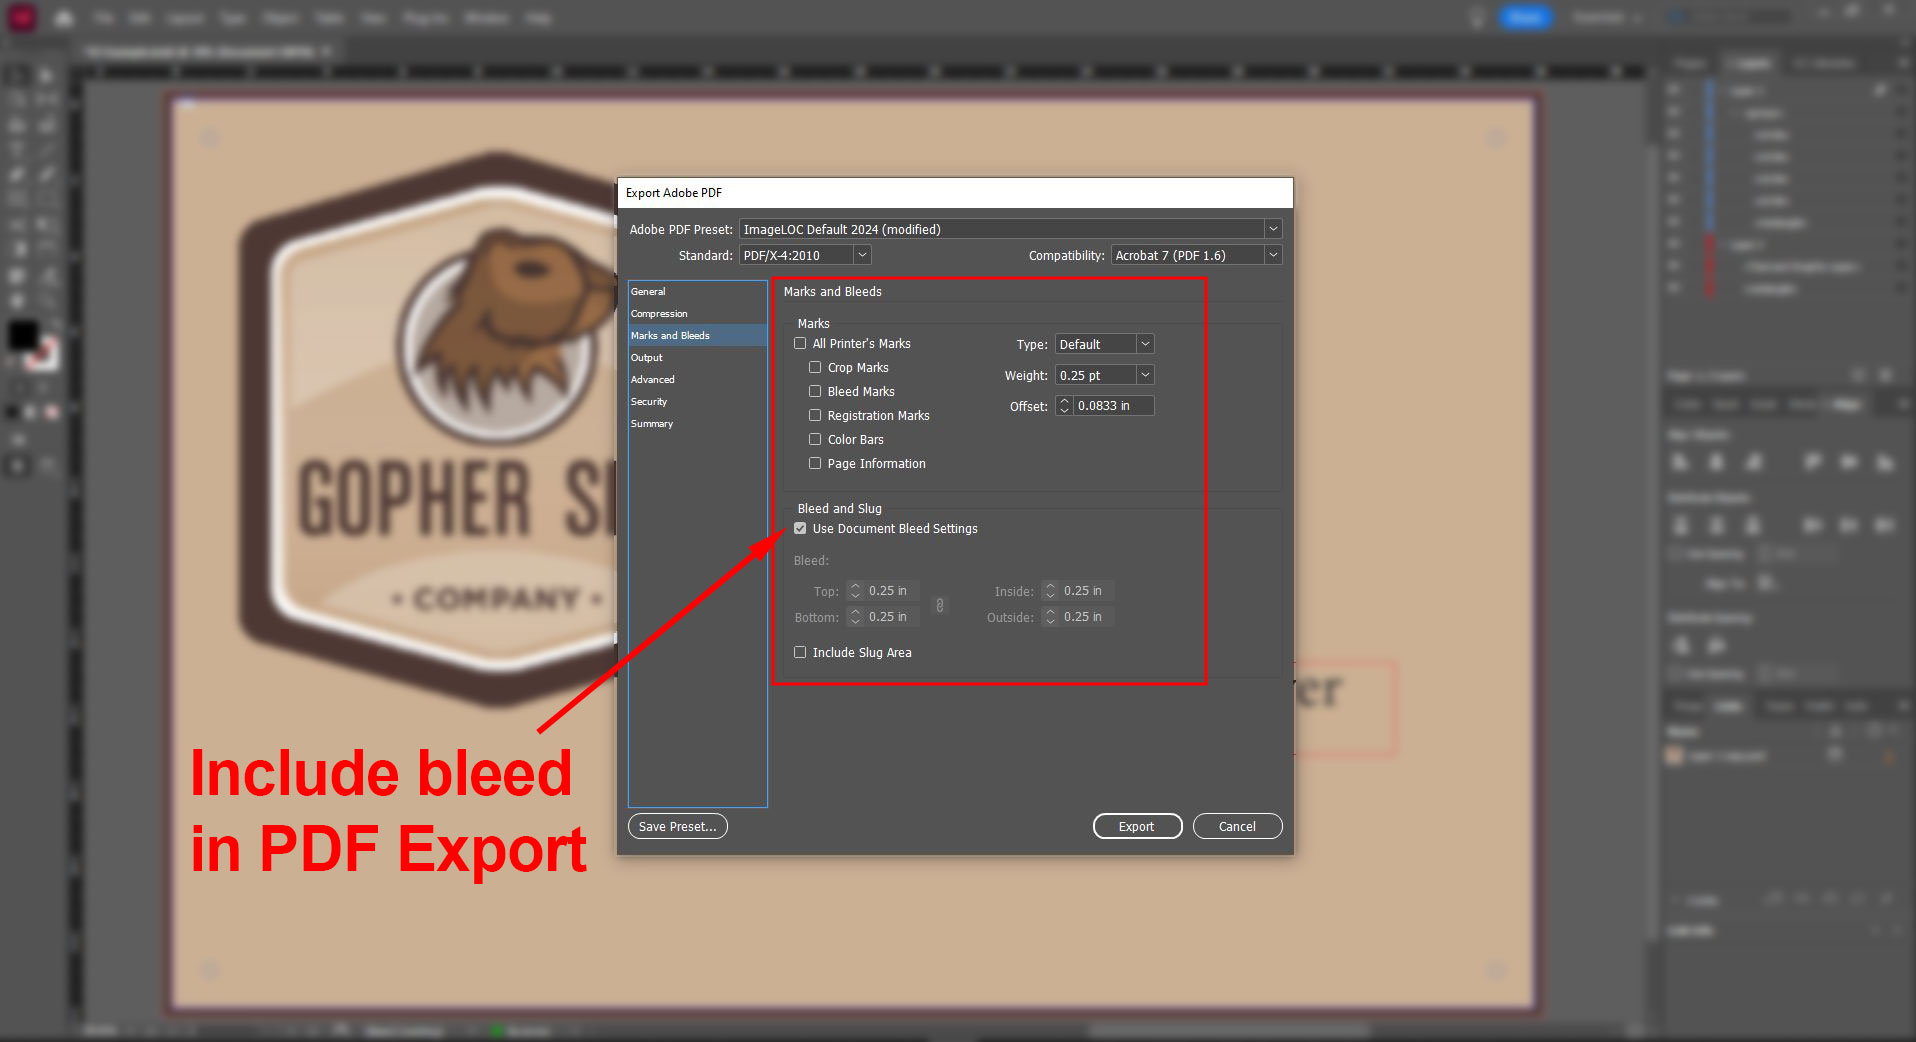
When you create your document, set your document size to the final panel size for both width and height. Set Bleed to 0.25″ on all four sides. While we print in CMYK color space, RGB has a larger available color gamut to work with. Our RIP software does the heavy lifting at the finish line to convert to a compatible print formula. The raster effects should be at the High setting of 300 ppi.
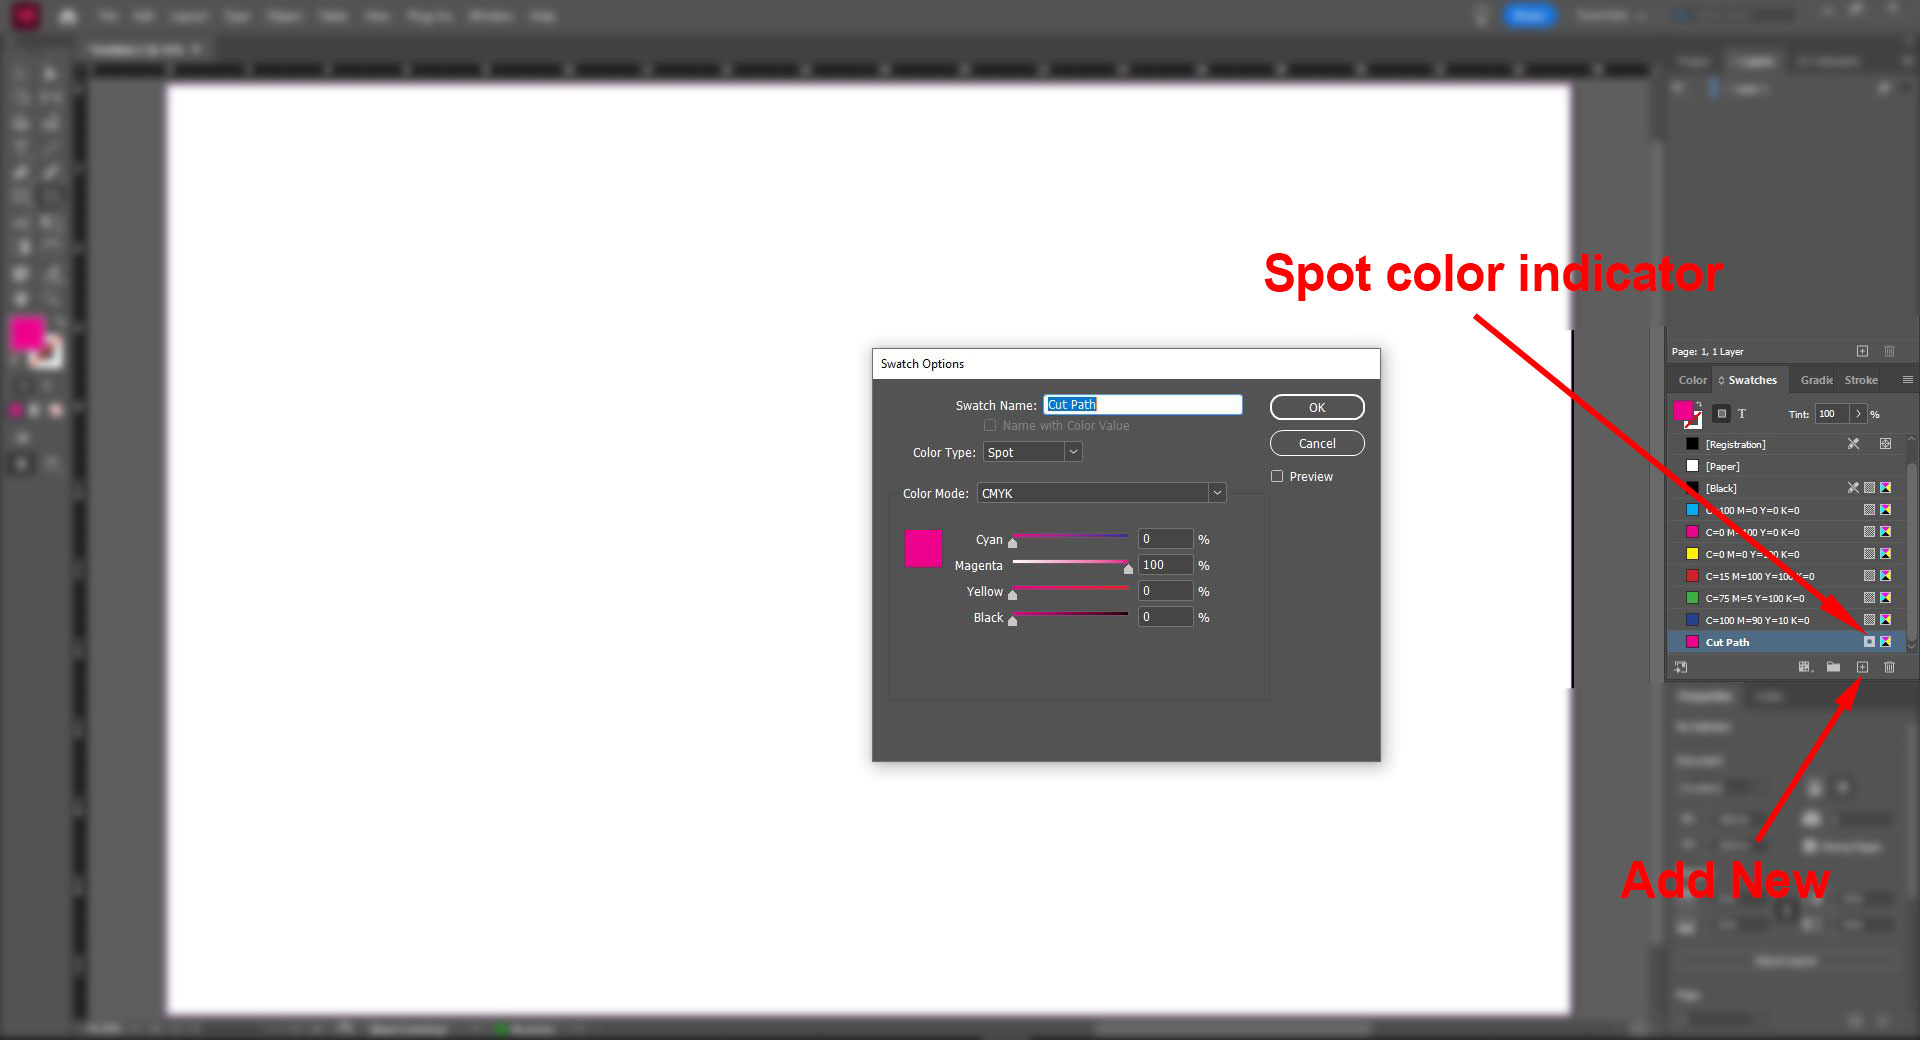
Cut Paths are an important part of the file, it allows you to control the size and shape of the final panel. It also allows you to place mounting holes and features where you need them to be. This is achieved by creating a spot color named “Cut Path”. Our automated software separates that spot color out for use during the CNC cutting of the panel blanks, and removes it from the final print file. This spot color WILL NOT PRINT on the panel.
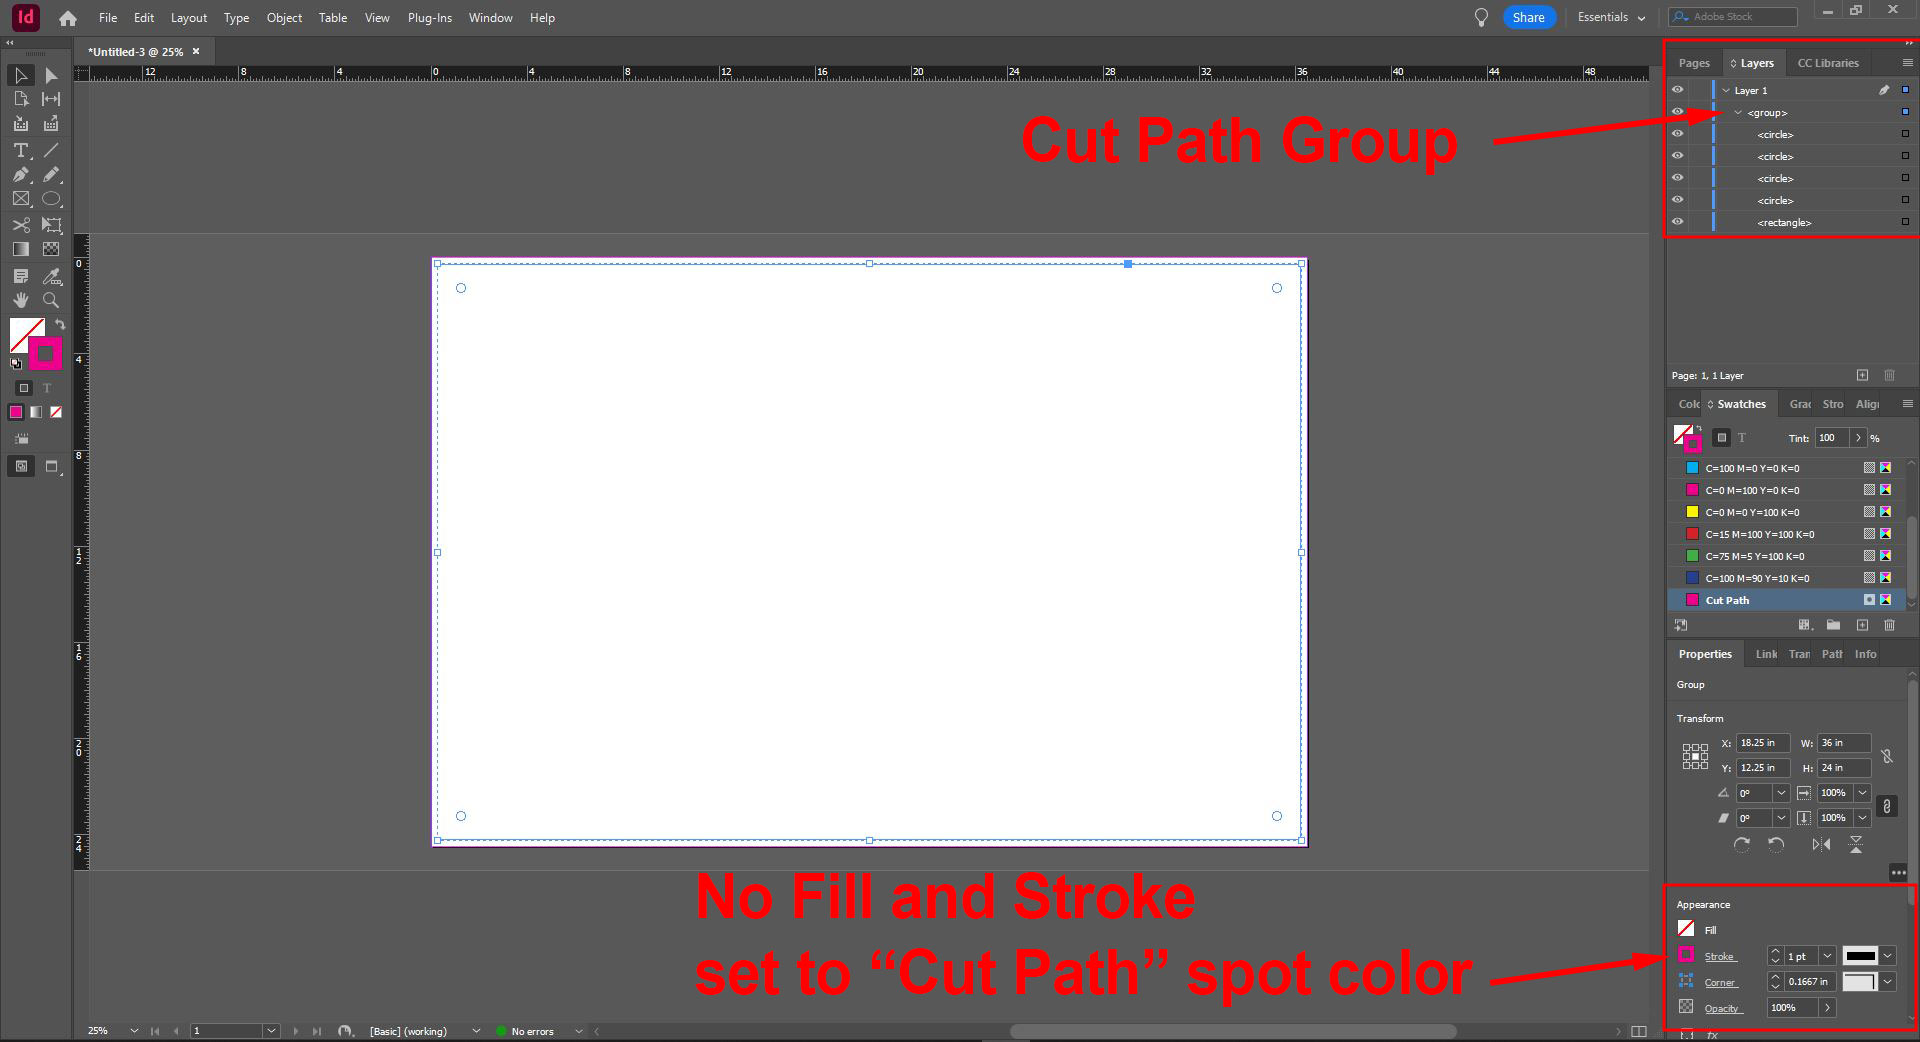
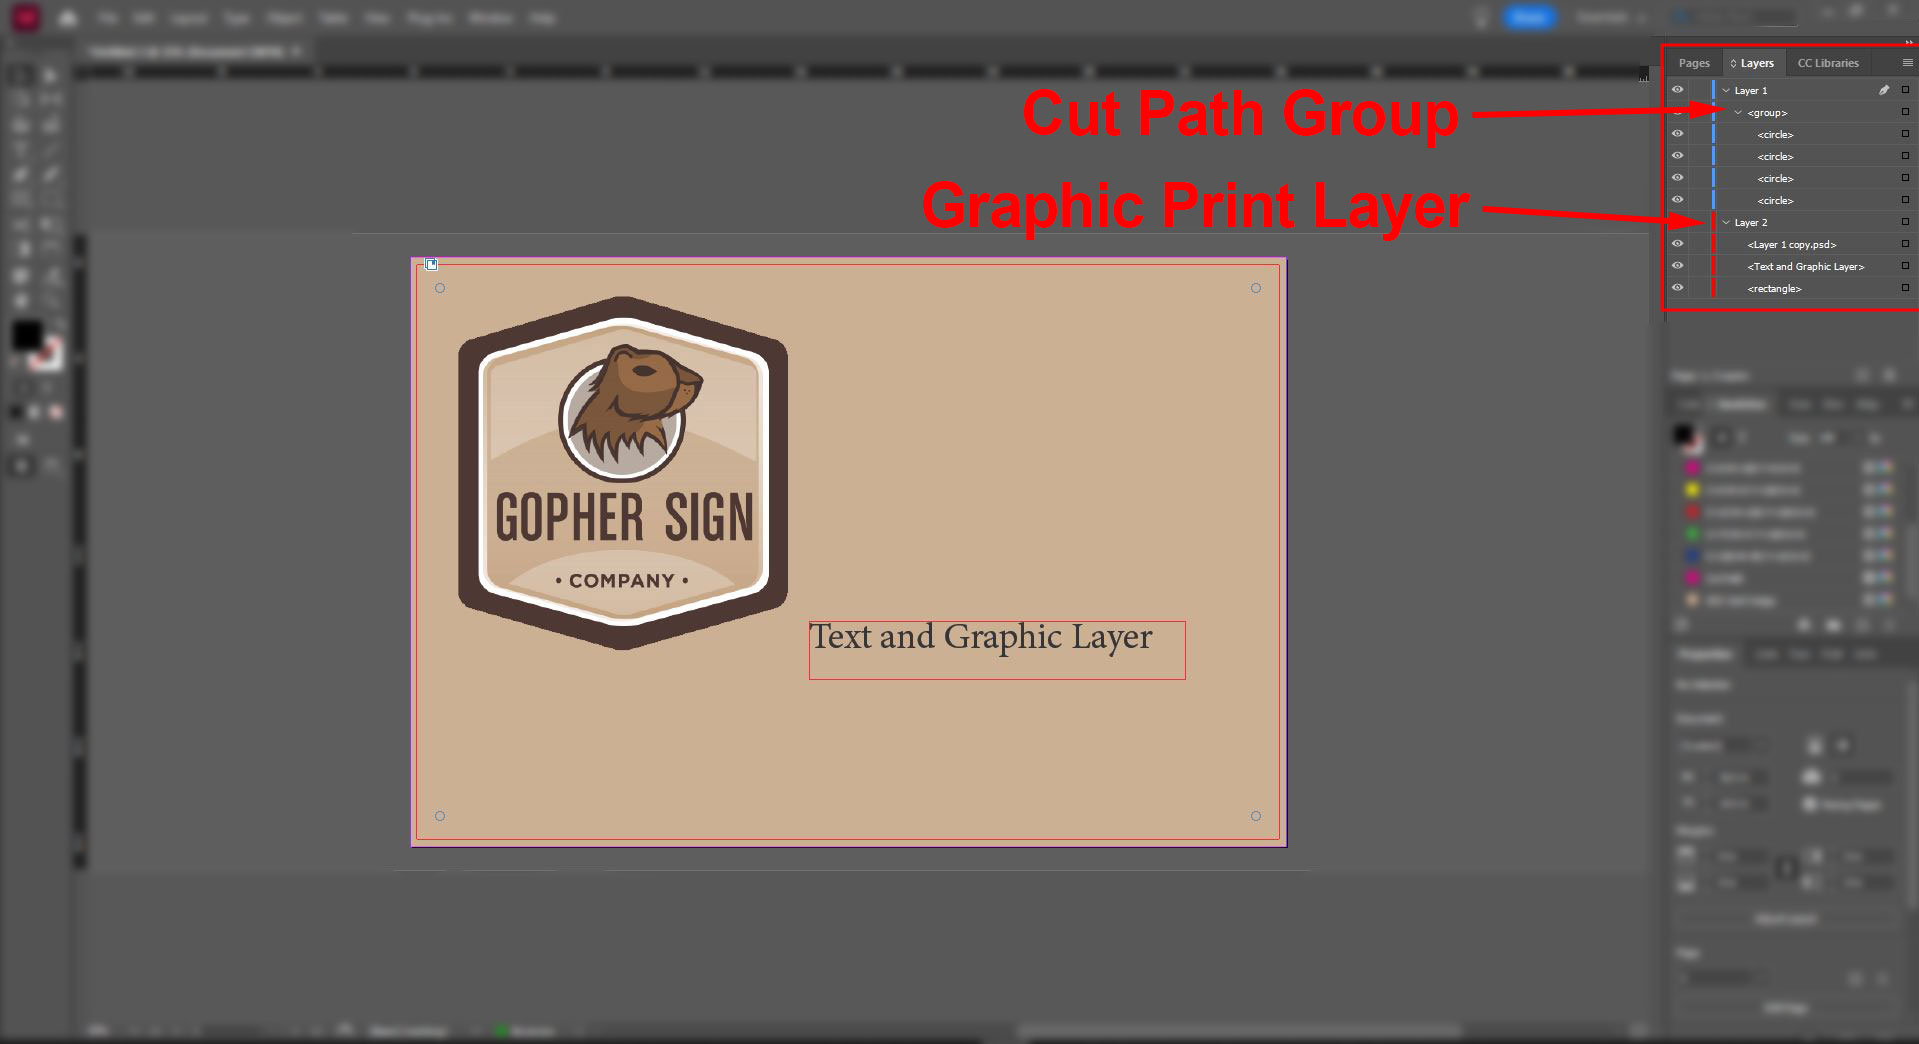
Set your cut path shapes and holes to a 1 point (0.0139″) stroke using the “Cut Path” spot color you created. Group them together in their own layer and center the group vertically and horizontally in relation to the document.
3/8″ studs must be indicated by 2.04″ diameter
1/4″ studs must be indicated by 1.29″ diameter circles
Important note about spot colors, our RIP software recognizes and matches Pantone spot colors when they have the full naming convention “PANTONE 123 C”. A spot color short named like “PMS 123 C” will not be recognized, and will be converted to CMYK.
Transparencies should NOT be applied to spot colors. Adobe warns that external programs will interpret the transparency different causing unexpected results to occur, and they do!
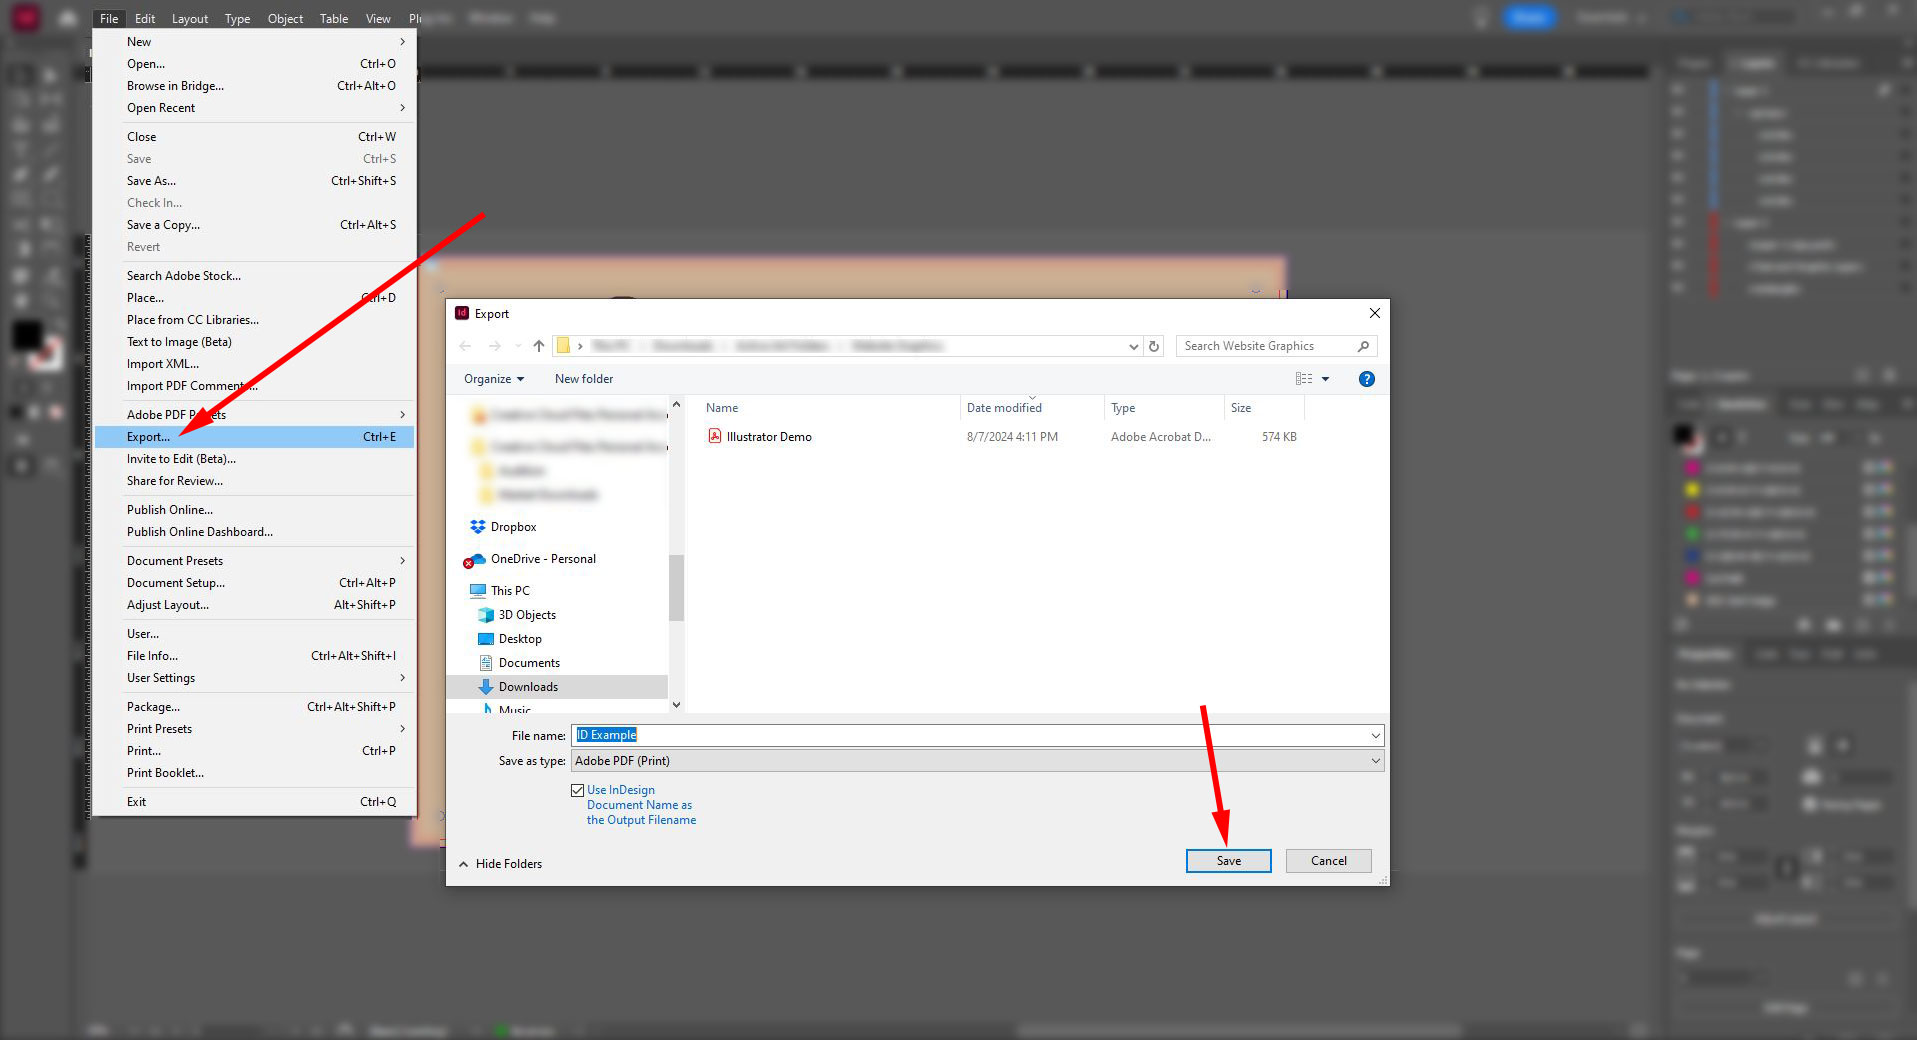
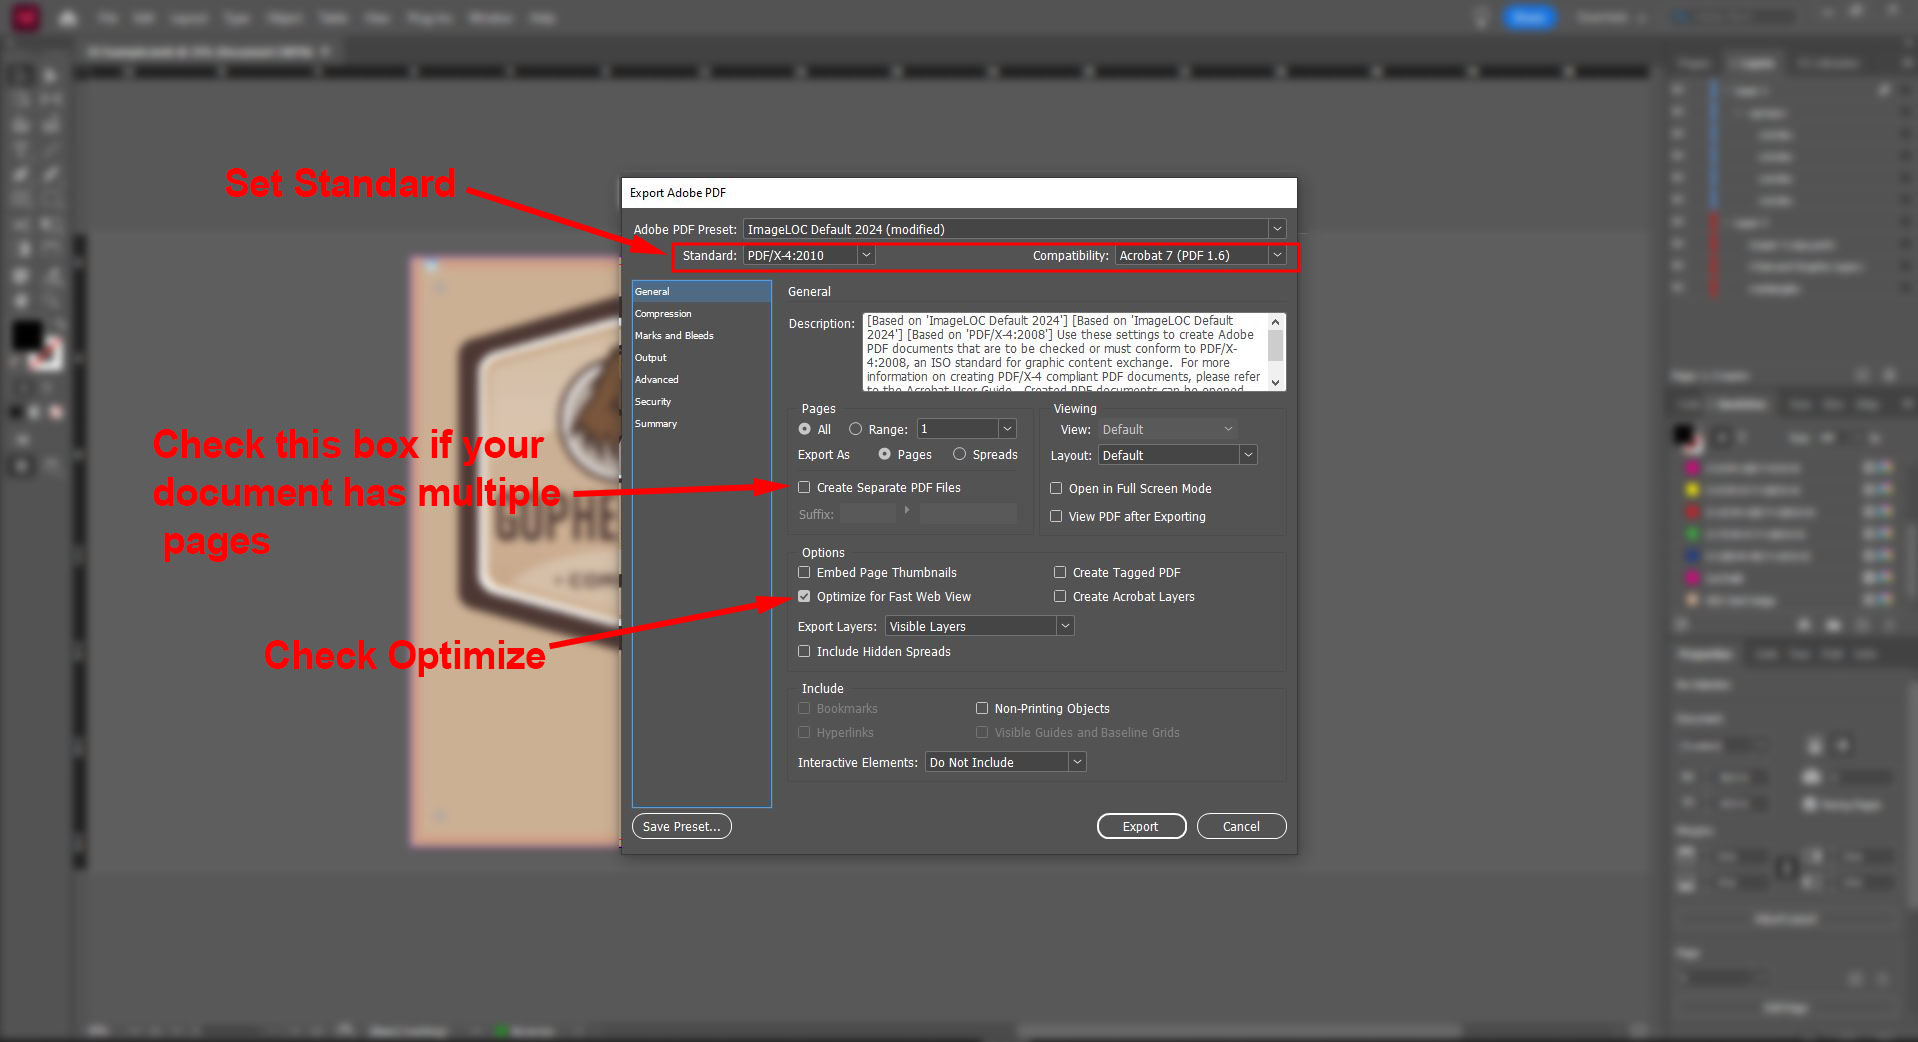
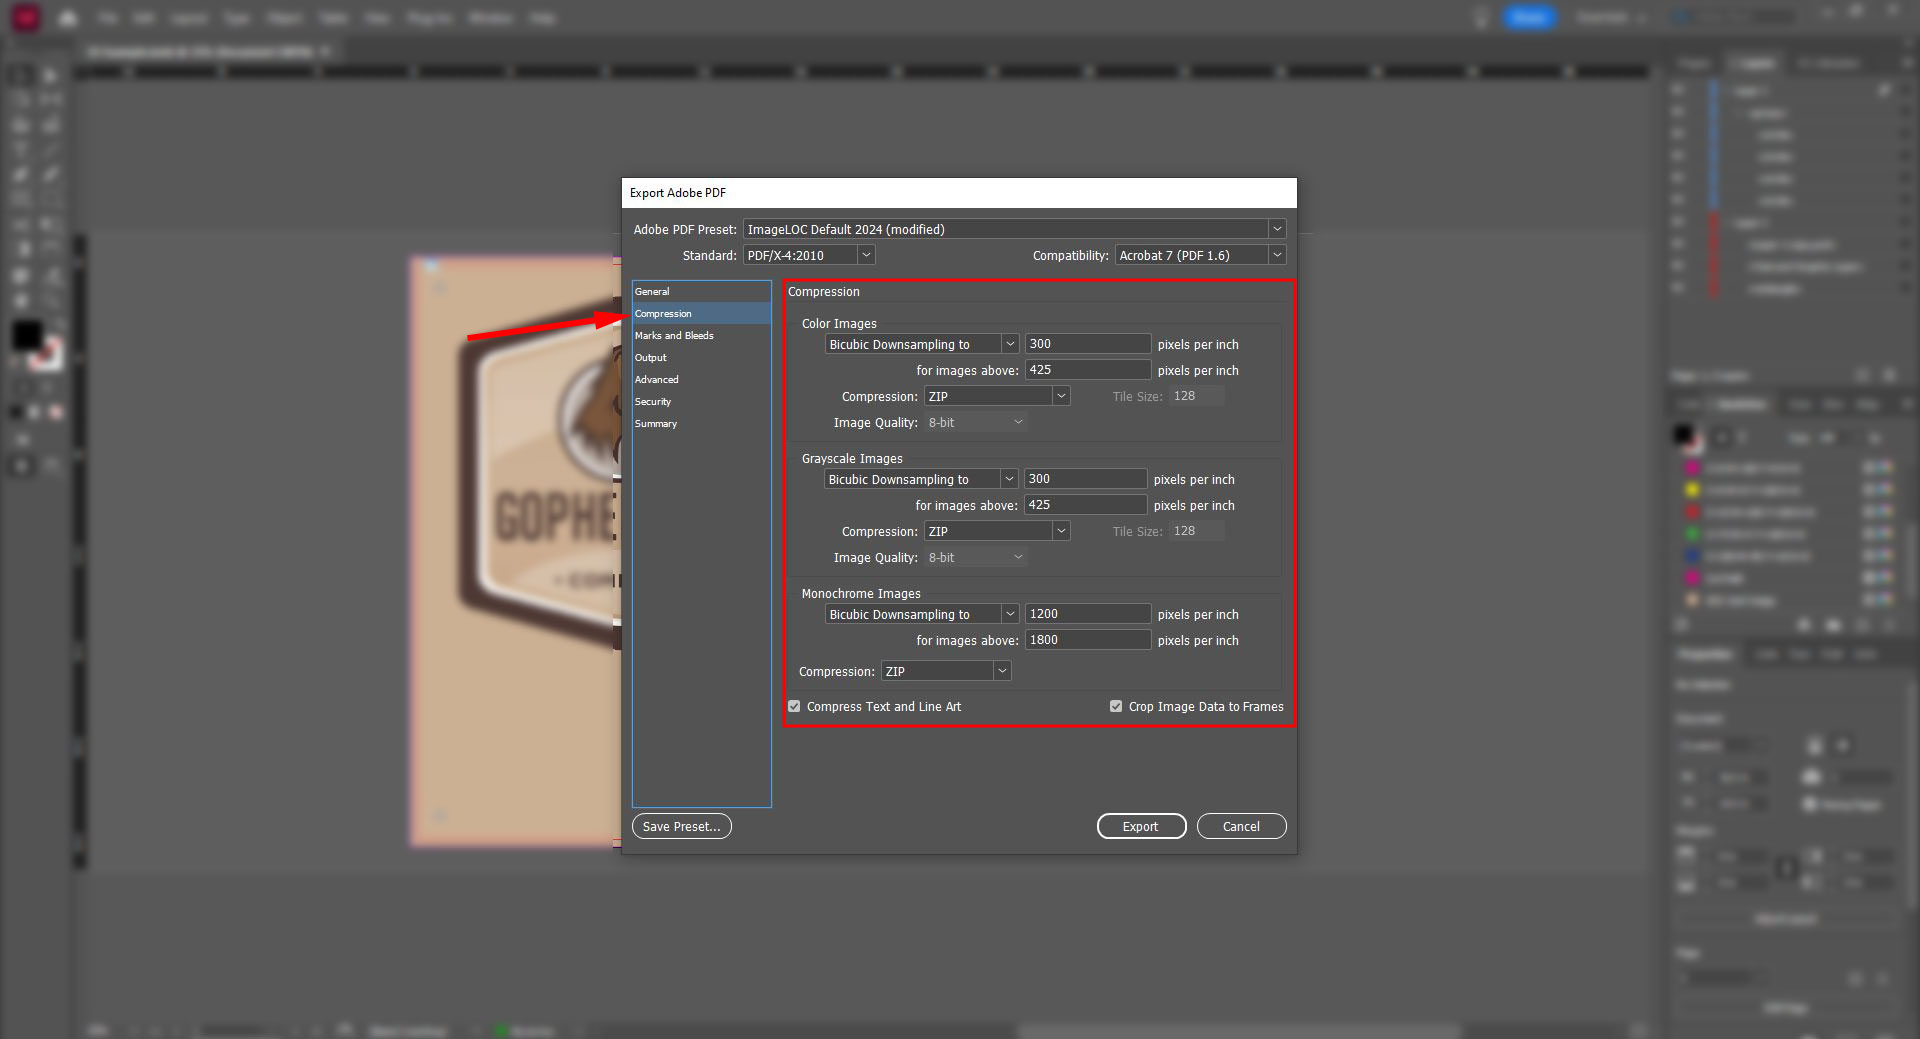
In the “Output” tab, select “No Conversion” for color output, and select “Coated GRACoL 2006” for Output Intent Profile. No settings in the Advanced, Security, or Summary tabs require adjustment. After you made all the adjustments in all the tabs, click the “save preset” button at the upper right and label accordingly. This will allow you to quickly and repeatably export your ID documents for optimum output. Click “Save PDF” to complete the export.
You now have a perfectly setup file for upload into our Art Portal!
Contact art@gophersign.com for questions.
Detailed instructions coming soon – Refer to Adobe Illustrator or InDesign tabs for concept interpretation.
Contact art@gophersign.com for questions.
Detailed instructions coming soon – Refer to Adobe Illustrator or InDesign tabs for concept interpretation.
Contact art@gophersign.com for questions.
Detailed instructions coming soon – Refer to Adobe Illustrator or InDesign tabs for concept interpretation.
Contact art@gophersign.com for questions.

